Apex Legends has become a game we have grown to love for almost four years now. From the day it was released until now, this community has come together and discussed helpful tips and information to improve our gaming experience. But often, my Xbox family gets left out, and that is why I’m here! I’ll be helping you with the best settings directed specifically for Xbox players to get the most out of your game and help you claim the title of Apex Champion.
15-Prompt Style
Image
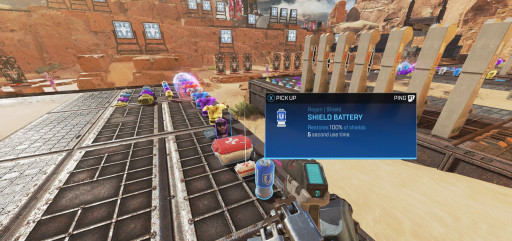
A default prompt style taking up a great amount of space within your vision.
One of the many settings that you can change for your benefit in Apex is that of Prompt Style. Prompt Style can be described as the way the game shows you information on screen. As a beginner, this is extremely helpful to have set to the default setting since it will build your understanding of the game.
Unfortunately, once you have developed an understanding, this will start to impair your vision and become a nuisance. Ideally, you would change this to a compact view in order to provide you with better sight and awareness of your surroundings.
How To Apply:
Press Start and go into Settings
Go to the Gameplay Tab
The first setting should be Interact Prompt Style
Change it from Default to Compact
14-Ping Opacity
Image
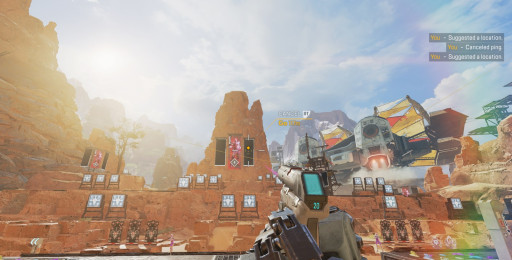
Having your Ping Opacity set to default means the icon is more visible and distracting during games.
A visual setting meant to minimize screen clutter is that of Ping Opacity. Apex Legends is very dependent on team communication to be successful in the arena and one of those ways is the Ping System. But have you ever played with someone who used this too much? I know I have and that’s not even the worst part.
Perhaps the worst part, in my opinion, is the fact that those pings tend to stay on your screen! I’ll be honest, not everyone is like me, but those who are understand the pain of having something always in your view. Setting this to Faded will make it less noticeable and reduce the clutter on your screen.
How To Apply:
Press Start and go into Settings
Go to the Gameplay Tab
Scroll down to Ping Opacity
Switch it from Default to Faded
13-Vibration
One setting that is often overlooked by many players is that of Control Vibration. This setting is meant to provide you with physical feedback during moments of gunfire or explosions. However, it is this feedback that can have a negative impact on your game.
The negative effect is the fact that this vibration may change the way you aim during a fight. If we were to have this on in the middle of a gunfight, when you get hit by an enemy’s bullet, it’ll cause the controller to shake and affect your aim. While it might not seem like much, every little bit helps and can give you a leg up on rival players.
How To Apply:
Press Start and go into Settings
Go over to the Controller Tab
Scroll down towards the bottom to find Vibration
Change it from On to Off
12-Minimap Rotation
Image
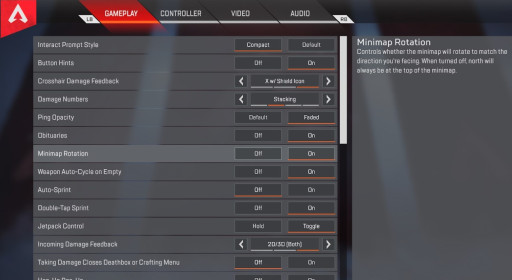
Under the Gameplay tab, Minimap Rotation allows you to decide how the in game map reacts in relation to you.
Now you may be wondering how this can help you and that is understandable since most players overlook the Minimap. Having an accurate map can be extremely helpful when getting a better understanding of your surroundings. You have two choices for this. The first is having Minimap set to be stationary and set to North or, what I would suggest, setting it to Rotation.
By setting it to rotate, you become the center of the map, making it easier to orient yourself. When you have it set to Stationary, if you are facing the wrong way, you may accidentally run in the wrong direction when trying to rotate to get positioning. So having the rotating map will make it correlate with your vision.
How To Apply:
Press Start and go into Settings
Go to the Gameplay Tab
Find Minimap Rotation
Turn it to On
11-Sprint View Shake
Another way to improve your gameplay is to improve your visibility. One way to do that is to fix the setting that affects Sprint View Shake. Sprint Shake is an immersive setting meant to replicate the movement of your head when running. While it may make gaming more realistic, it doesn't provide an advantage for you.
Changing this to Minimal will reduce the movement of your screen and will increase your aiming since the blur is lessened. Additionally, the reduction of movement grants you a smoother transition into aiming without the issue of having your vision jump around.
How To Apply:
Press Start and go into Settings
Go over to the Video Tab
The last setting should say Sprint View Shake
Set this to Minimal
10-Reticle Color
Image
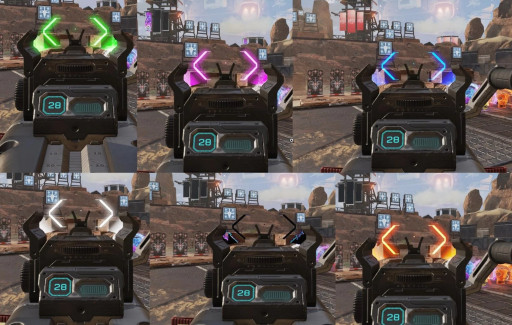
With a wide variety of colors, customizable reticle colors help you with cleaner and clearer sights for aiming.
A nice customization option that adds a little something to your gameplay would be Reticle Colors. Reticle colors give you the ability to change your sights to a color of your own choosing. You could just pick your favorite color and be done with it, but you’ll be missing out on improving your game. A different colored sight allows you to see it more clearly when aiming.
This improvement in vision is important when you are in the middle of a fight or trying to spot people at a distance. Apex gives you a default set to pick from, but also gives you an entire slider to have full control. The best practice is to go to the Firing range and pick one you like that stands out.
How To Apply:
Go to the Firing Range – Apex gives a couple previews, but I prefer actually seeing it
Once in, press Start and go into Settings
Scroll until you see Reticle and select Customize
You’ll be given 4 preset colors and a slider for full customization
9-Crosshair Damage Feedback
Crosshair Damage Feedback can be understood as hit markers similar to many other games we’ve played. But unlike other games, Apex Legends can give you additional information when you record a hit on a player. The additional information given is of what shield the enemy is wearing and when it breaks.
While some may suggest turning this off to reduce screen clutter, which is a good point since the X and the shield icon do take up room on screen. I suggest leaving it on since it’ll allow you to gather more information when you crack and break an enemy’s shield, letting you push without hesitation.
How To Apply:
Press Start and go into Settings
Go into the Gameplay Tab
Towards the top find Crosshair Damage Feedback
Turn it to Off to reduce screen clutter or X w/ Shield Icon for more information
8-Damage Numbers
For those who may not know, Damage Numbers are the numbers that pop up when you shoot another legend, telling you how much you hurt them. A key tool for information gathering to help you make sound decisions during a game, it is important to have this set correctly. When we go to this setting, we’ll notice we have four settings to pick from.
The first one is None, meaning that you won’t get any information. Floating is a way to see each individual shot and do damage calculations on your own. Stacking will take each shot and add them automatically for you. Lastly, Both is a combination of Floating and Stacking. To make it easier, I use Stacking since it removes the math.
How To Apply:
Press Start and go into Settings
Go to the Gameplay Tab
Find the setting Damage Numbers towards the top
Select Stacking
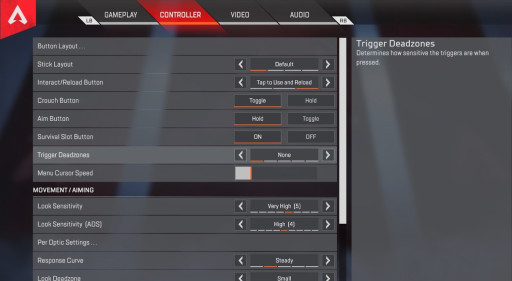
7-Trigger Deadzones
Image
In order to maximize efficiency with your control, adjusting Trigger Deadzones will grant you a faster response time when you press your buttons.
Unlike PCs, console players have the ability to adjust their Deadzones to increase response time. The first Deadzone we’ll talk about is known as Trigger Deadzones. A Trigger Deadzone is the distance that is required before your controller registers a button press.
Having this set to None will mean the moment you press the triggers, the game will register it. So, while this may only be a split-second, that half-second could possibly mean you get your gun off first, increasing your chances of winning.
How To Apply:
Press Start and go into Settings
Scroll over to the Controller Tab
Under the top half of the screen find Trigger Deadzones
Set this all the way to None
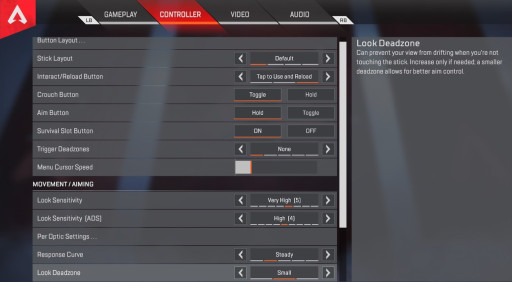
6-Look Deadzone
Image
Similar to Trigger Deadzones, the Look Deadzone can quicken your movement by reducing the distance it needs to travel before being registered.
The second Deadzone we’ll change is that of the Look Deadzone. Similar to Trigger Deadzone, this changes the amount of “slack” within your analog stick. It is this slack that can cause a slight delay when moving the analog.
Setting this as low as possible will minimize the threshold needed from the moment you touch your analog to seeing it on screen. There is a caveat, and that is if you own an older or a controller with sticky analogs, then setting this too low will lead to controller drift.
How To Apply:
Press Start and go into Settings
Stay under the Controller Tab
Move down to the lower half of the screen to find Look Deadzone
Set to Small or None depending on your controller
5-Response Curve
Another setting that will affect your controller and make improvements to your game by raising your overall aim is Response Curve. Don’t worry if you don’t know exactly what this is. I didn’t either. The easiest way I can describe this is the way your analog stick reacts to your movements. Now this can be very personalized depending on your play style.
Developers give you a total of five options to select from, each with a specific play style in mind. For example, High Velocity is a setting in which the smallest movement is accelerated, so if you are someone that tends to get nervous in high-intensity situations, this isn’t for you. Personally, I prefer the Steady setting as it seems to work best for me. If it’s needed, head into the Firing Range and test them out.
How To Apply:
Head into Firing Range
Press Start and go into Settings
Head back to the Controller Tab
In the bottom portion of the settings, find Response Curve
Out of the five, Steady is best for me but feel free to try the others
4-Taking Damage Closes Deathbox
In order to go from a novice player to an experienced player, one needs to use strategies and tactics that most don’t understand or use. One of those tactics is known as Shield Swapping. This is the process of quickly running into a Deathbox and replacing your damaged or broken armor with a new one. But in order to do this and make it easier, you will have to turn off Damage Closes Deathbox.
Apex Legends does a good job of helping out their new players with the use of default settings, like with Prompt Style or Vibration. But having this on by default will make it harder to swap armor since the moment you get hit, it’ll take you out. But remember if you do this, you must be quick as to not give someone free shots at you since you’ll be standing still for a moment.
How To Apply:
Press Start and go into Settings
Go to the Gameplay Tab
About half way, you’ll see Taking Damage Closes Deathbox or Crafting Menu
Switch this from On to Off
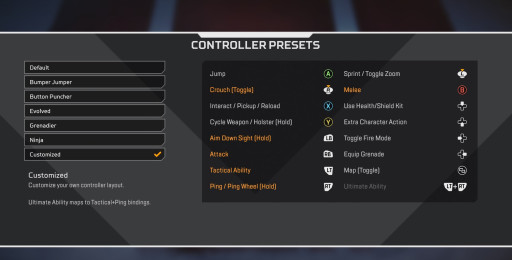
3-Button Layout
Image
A fully customizable button layout gives you added benefits and comfort.
Another major advantage I’ve found in my years of playing Apex Legends was changing the layout of my controller. Customizable buttons give you a very personalized feel to your game and help with gaming strategies. It is important to maximize your efficiency, and rerouting certain buttons does just that.
It is important to point out that Apex gives multiple layouts to select from, so you can find a preset that works best for you. I personally select Customized since I make two very specific changes. First, I switch my crouch to my analog because this allows me to crouch mid fight, making me harder to hit. Next, I flipped my bumpers and triggers, giving me a faster fire rate with single-fire or burst weapons.
How To Apply:
Press Start and go into Settings
Scroll over to the Controller Tab
The first setting should be Button Layout, click on it
Once you open it, you'll see six preset layouts and one customizable one
To do my setup, click Customized to reprogram your layout
Press A on Crouch, then press R3
Press A on Aim Down Sight, then press LB
Press A on Attack, then press RB
*You do not need to switch the buttons being replaced since it will do it automatically*
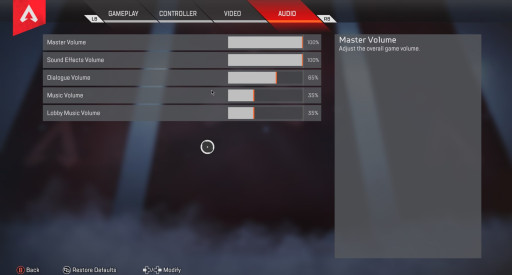
2-Audio
Image
Apex audio has a total of five sliders to optimize your game sounds so you can get the most out of your gameplay.
Maybe one of the most important things to change when optimizing your settings would be your Audio. It is not uncommon to hear many players complain about how the audio is broken within Apex and how you can’t hear players running up. While sometimes the audio does bug out, it’s really because they haven’t set up their sliders correctly. Apex developers give you a total of five sliders to customize the volume levels.
Now it’s important to understand that you do not want to set everything to 100% because that is what causes issues for you. When everything is maxed out, audio will overlap, causing you to miss important sounds like footsteps, gunfire, or even healing. Hearing these sounds can give you information on when to take cover, rotate to 3rd party, or push a team.
How To Apply:
Press Start and go into Settings
Head to the Audio Tab
You will see five sliders labeled: Master, Sound Effects, Dialogue, Music, and Lobby
Set the first two, Master and Sound Effects, to 100%
Next, set Dialogue to 65%
Lastly, set both Music and Lobby to 35%
1-Field Of View
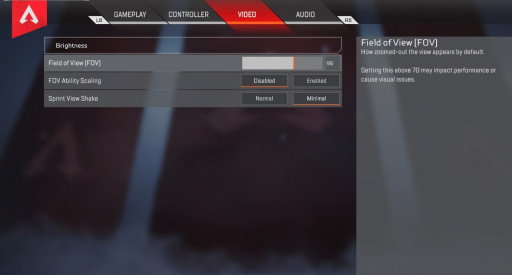
Image
Increasing Field-Of-View gives you an edge over other players who use the Default value.
While it is impossible to say one setting makes all the difference, Field-Of-View has a strong case to make that claim. FOV can be described in many ways, but it is essentially the angle of your vision. Increasing this value increases what you can see on screen, giving you better visibility.
Being able to have increased visibility of your surroundings is critical to success within Apex. A better understanding of your surroundings will allow you to spot rival legends quicker or take cover with ease. One thing that is important to understand is that this will increase the workload on your console, so depending on the generation of your Xbox or simply its age, it is best to find a happy medium between performance and vision.
How To Apply:
Press Start and go into Settings
Head over to the Video Tab
Click on the Field of View Slider
Increase the Default value of 70 to one you find comfortable, I prefer 96
Brandon is a lone survivor of the Florida Wasteland, his journey has led him here, to The Grid. Learning along the way, a pen wields no strength unless the hand that holds it has courage.