Here are the Best Apex Legends Settings to get you more kills.
Now that the competition has had enough time to sharpen their skills and get acclimated to the game. Let's get into the nitty gritty of APEX LEGENDS and hop into the settings and make some tweaks that’ll help increase that kill count of yours.
1.Adjust Your Sensitivity
Depending on the game you are playing there are benefits to higher sensitivity to cover more ground when aiming. However there are times in Apex where you will need less sensitivity. When you are pinging items for teammates for instance. This will also help you
How to apply the setting: Keep Sensitivity(ADS) to DEFAULT(3). Up your Sensitivity to high (4). This has worked out for me so far.
This will help you find the perfect balance of quick movement when avoiding incoming gun fire and proper sensitivity when pinging items/locations for teammates as well as better control for small adjustments when shooting over longer distances.
2.Adjusting Response Curve
This setting will directly adjust how quickly you raise your gun when. Based on preference you can have subtle but effective change in the “weight” of your gun, well that's at least how it feels.
How to apply the setting: Adjust Response Curve. HIGH VELOCITY, LINEAR is worth a try with those with great reflexes. For others like me, who admittedly has the reflexes of a Mongoose try adjusting to STEADY.
When you shoot you will have less of an adjustment needed to compensate for recoil. Not a drastic change but definitely noticeable when emptying huge clips at long/medium range because... you don’t have time to bleed.
3.Turn off Vibration
I know feeling the vibration is cool and helps immerse you in the experience. But this can impede your reaction time seeing to it you are more likely to miss shots the longer you shoot.
How to apply the setting: Switch vibration to off in the controller settings . Go to the CONTROLLER tab in your settings and scroll down to VIBRATION, switch to OFF.
I found that I had to make less small adjustments to stay locked on my target once I didn’t have to compensate for a shaking controller. Give it a shot.
4.Adjust Damage Numbers
You definitely want t o have a good idea of the damage you are inflicting in a gunfight, by default it is set to STACKING, which shows the combined damage you have inflicted.
How to apply the setting: Go to DAMAGE NUMBERS in your CONTROLLER SETTINGS and change to FLOATING
Now when you shoot you will see a damage output indicator for each shot, this will help you better identify headshots, as well as armor type as you attack.
5.Color Blind Mode
For gamers who may have difficulty distinguishing friend or foe on the battlefield by display color.
How to apply the setting: You can turn this feature ON in your GAMEPLAY settings.
This will make spotting enemies and friendlies easier. I remember my brother, who is actually colorblind have trouble telling the difference and would shoot at teammates. Once he switched the color blind mode he no longer had this problem.
6.Interact Prompt Style
Once you are familiar with the game it is recommended to switch this from DEFAULT to COMPACT. This will reduce the text size and take up less of you screen when scanning over items.
How to apply the setting: Go to SETTINGS and go to GAMEPLAY tab, select COMPACT.
Once you are familiar with the guns, armor, items etc switching this will give you a small tactical advantage with less of the screen being used to show item descriptions.
7.Ping Opacity
When a teammate has pinged an item you want to be able to spot it. Especially in situations when you and your team are in different areas looting. Keeping this on DEFAULT ensures the best visibility on items pinged.
How to apply the setting: Go to Gameplay Settings and go to PIG OPACITY, make sure this is on DEFAULT. This makes pings easier to spot with no fading.
Better visibility on items you may need is a no brainer. Even if you are a lone wolf you still want to have full visibility so you don’t miss something you may need.
8.Obituaries
Make sure you have this on as it alerts you to downed teammates. I highly recommend that you keep this on as you need to know when your teammates have fallen and can be resurrected, and also when they have died.
How to apply the setting: in your GAMEPLAY settings, make sure you have this ON.
You need your teammates alive, yeah you may be the kill master. You may be the player who can carry their squad. I honestly can’t think of a reason why you would want to turn this feature off. Being out of the loop with your team status Just isn’t the business.
9.Adjust Incoming Damage Feedback to 2D
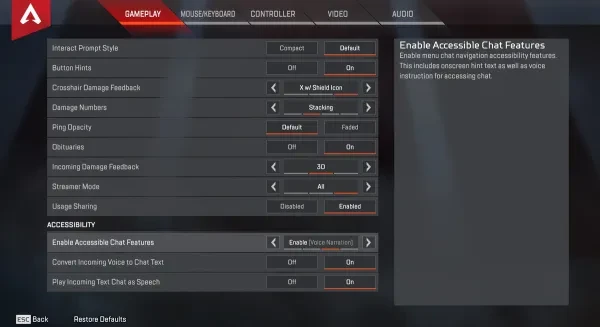
It is important to know who is shooting at you when taking damage from an unknown location. I had a hard time with the 3D arrow pointing me the right way. Switching this indicator to 2D makes it much easier indicate the direction you are taking damage.
How to apply the setting: Go to SETTINGS>GAMEPLAY and switch INCOMING DAMAGE INDICATOR to 2D.
Switching this will help you quickly locate your pursuer and return fire quickly. This will put them on the defense as well now that you aren’t just running in circles and will give you the window you need to slide to cover, if necessary.
10.Enable Accessible Chat Features
More so for those who aren’t playing with friends or without a microphone. Turning this feature on will convert chat to on screen text.
How to apply the setting: Go to SETTINGS>GAMEPLAY. Scroll down to Enable Accessible Chat Features and switch to ON.
A must if you are playing solo. Communication is key between you and your team and this helps keeps you in the loop with team communication.
11.Interact/Reload Button
This is really a matter of preference but for ease of use I recommend switching this over to TAP TO USE AND RELOAD. This helps you pick up items and reload your weapon by tapping, which is needed when you are looting on the run..
How to apply the setting: Go to SETTINGS>CONTROLLER. Scroll down to INTERACT/RELOAD BUTTON and switch to TAP TO USE AND RELOAD.
This is best for picking up items quickly and reloading quickly by tapping instead of having to hold the button down for either action, which slows down both substantially. That is unless you have grown accustomed to this in other games. Feel free to play with this one.
12.Crouch Button to Toggle
When traversing the arena, crouching is necessary to hide behind objects, as well as sneak when you are looking to approach an enemy making as little noise as possible. You can set this to switch with a button tap, or set to remain crouched as long as you have the button pressed.
How to apply the setting: Go to SETTINGS>CONTROLLER. Scroll down to CROUCH and switch to TOGGLE.
Having to hold the button while you are crouching makes looting while ducking a hassle. I play on consoles and I had to release my crouch button to start looting. While this admittedly isn’t a big deal, it makes ducking when returning a player’s beacon or creepily going through a supply bin while keeping my head low.
13.Adjust Field of View
Depending on the screen size you are playing on and the distance from said screen, playing with field of view can give you a tactical advantage.
How to apply the setting: Go to SETTINGS>VIDEO. Scroll down to CROUCH and switch to TOGGLE.
Properly adjusting this option will give you a wider field of vision giving you a advantage with increased “peripherals”. Make small adjustments as increasing this TOO much can make targets in the distance smaller.
14.Turn Sound Effects Up
Whether you wear headphones or not, you want to have your sound effect volume all the way up. Enemies and teammate footsteps are critical to staying alivealove so you want all the sound you can get.
How to apply the setting: Go to SETTINGS>AUDIO. Scroll down to SOUND EFFETS VOLUME and toggle to 100.
Being aware of your surroundings in absolutely imperative in APEX. Gunshots in the distance, footsteps of a potential flanker, even the sound of a door opening nearby while looting will keep you aware of any threats nearby.
15.Enable Button Puncher Preset
Switching your controller profile will switch the buttons used for CROUCH AND MELEE. Recommended for players who prefer to melee attack with the press of a button instead of by clicking the left thumbstick.
How to apply the setting: Go to SETTINGS>CONTROLLER and switch from DEFAULT to BUTTON PUNCHER.
This will give you an advantage with the slide button making maneuvers feel more intuitive and fluid. Also this could help you be more effective timing your melee attacks better.
16.Switch To Button Puncher Preset
Switching your controller profile will switch the buttons used for CROUCH AND MELEE. Recommended for players who prefer to melee attack with the press of a button instead of by clicking the left thumbstick.
How to apply the setting: Go to SETTINGS>CONTROLLER and switch from DEFAULT to BUTTON PUNCHER.
This will give you an advantage with the slide button making maneuvers feel more intuitive and fluid. Also this could help you be more effective timing your melee attacks better.
17.Switch To Button Puncher Preset
Switching your controller profile will switch the buttons used for CROUCH AND MELEE. Recommended for players who prefer to melee attack with the press of a button instead of by clicking the left thumbstick.
How to apply the setting: Go to SETTINGS>CONTROLLER and switch from DEFAULT to BUTTON PUNCHER.
This will give you an advantage with the slide button making maneuvers feel more intuitive and fluid. Also this could help you be more effective timing your melee attacks better.
PC ONLY Apex Legends Video Settings for Best Performance
Here is a list of the video settings you are able to adjust and how it can potentially optimize performance and overall gaming experience.
19.Display Mode
This setting sets the game to run fullscreen, a window (without border), or run in a window. It is recommended playing in fullscreen since it will give you a significantly faster overall frame rate
Having a better framerate will give you the best clarity and best visibility. This helps especially for spotting enemies at long range.
20.Resolution
Turning down your also gives you a significant frame rate boost in FPS (frames per second) but sacrificing image quality. Since I am sure you want to enjoy the game in all of its beautiful splendor, look at messing with this last you may get the desired result without losing out on the beautiful sites in the game.
Having a better framerate will give you the best clarity and best visibility. This helps especially for spotting enemies at long range.
21.Adaptive Resolution FPS Target
This reduces rendering resolution to attempt to maintain the desired frame rate. This is worth adjusting is if you have a desired frame rate in mind. But doing this could reduce the sharpness of your image and become overall a bit blurry. Save this setting for last as this should be avoided unless you have not other choice.
Having a better framerate will give you the best clarity and best visibility for spotting targets.
22.Adaptive Supersampling
This setting dynamically raises rendering resolution if the game is running faster than the target frame rate. Leave this setting disabled if you are looking for high performance.
Having a better framerate will give you the best clarity and best visibility. This helps especially for spotting enemies at long range.
23.Effects Detail
Effects Detail controls how detailed visual effects are. (Such as explosions and gunfire.) This will help you avoid incoming fire and explosions respectively. Try low to see how it make you feel. If it feels a little “off” to you. Medium should work just fine.
24.Aspect Ratio
The Aspect Ratio sets the aspect ratio of your display. Be sure to set this to the respective aspect ratio of the monitor you are playing on or it will stretch the game image.
Properly setting the aspect ratio will ensure vision isn’t obscured by any distortion in your image.
25.Anti-Aliasing
Anti-Aliasing – smooths the image out, especially noticeable with jagged lines. Very useful in scouting the area for enemies at long range. There really shouldn’t be any reasons you’d want to get rid of AA.
Let me be honest. In Apex Legends I am average at best. But even the kill masters use every resource to their advantage so do the same to level the playing field and have some fun out there, see you on the battlefield!
You may also be interested in:
17 Most Awesome 'Free FPS Games' That Don't Cost Money To Play!
Top 10 Ultimate Best FPS Games to Play in 2019
Top 21 New FPS Games for PC (2019-2020)
Top 11 Games Like Apex Legends (Games Unique To Apex Legends In Their Own Way)

