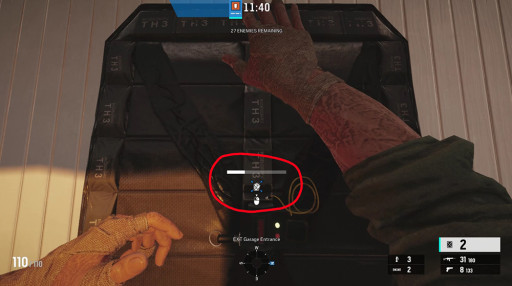
Hip firing, unlike in most fps games, is very unreliable in Siege. So, the crosshair, when you’re not in aim-down-sights (ads) position seems useless. But you shouldn’t really turn it off since it doesn’t really obstruct the screen a lot anyway, and it really helps when it comes to flick shots, since it’ll let you know accurately where you’re aiming at even when you’re not in ads position. And of course, it’s even a greater help when you’re using a shotgun, where hip-firing is actually quite effective.
How Crosshairs Solve the Problem:
Allows the player to flick his shots more accurately
Allows the player to be more effective when it comes to hip-firing with shotguns
How to Apply Crosshairs:
Click Settings
Go to Hud
Make sure that Crosshairs is on
14. Threat Indicator
Image
The Problem:
Threat Indicator lets you know when bullets fly by near you. This is important because it lets you know the direction where the shots came from, and therefore the general location of the enemy who shot it. This is an important intel that’ll let you know what to do, whether to take cover, or return fire at the shooter.
How Thread Indicator Solves the Problem:
Tells the player the general direction of the shooter
Provides the player the information he or she can use to respond appropriately, whether it is to take cover or to return fire
How to Apply Threat Indicator:
Click Settings
Go to Hud
Make sure that Threat Indicator is on
13. Hit Indicator
Image
The Problem:
Hit indicator is one of the most important parts of Siege, and is one of the settings that you shouldn’t turn off. Of course, you won’t receive it if the opponent is using a suppressor, but it doesn’t hurt at all to just leave it on. Hit Indicator will let you know the direction of where the bullet that hit you came from, thus allowing you to return fire effectively.
How Hit Indicator Solves the Problem:
Lets you know the direction of where the hit came from
Lets you react accordingly, whether by taking cover, or returning fire
How to Apply Hit Indicator:
Click Settings
Go to Hud
Make sure Hit Indicator is on
12. Grenade Indicator
Image
The Problem:
Grenade Indicator is a setting that you should never turn off. As you can see from the image above, it’s almost impossible to notice a frag grenade without it. The indicator itself is quite small and won’t obstruct your screen at all, so there is no downside to having this turned on. It’s very useful because it’ll tell you the direction where you should go to be away from the grenade, and it let’s you know the general distance between you and the grenade, because when it’s red, that means you’re still in the danger zone and if it explodes at that time, it’ll probably be fatal or cause a down-but-not-out (dbno state), but if it’s white, you’ll only be damaged slightly.
How Grenade Indicator Solves the Problem:
Lets you know that there’s a frag grenade thrown at you
Lets you know it’s location
Lets you know the direction where you should run to
How to Apply Grenade Indicator:
Click Settings
Go to Hud
Make sure that Grenade Indicator is on
11. Current Location
Image
The Problem:
Maps in Siege are pretty big and complex compared to other fps game maps. Plus, they all have multiplayer floors. It’s impossible to memorize the names of all the spots in all of the maps. That is why having the Current Location indicator on helps a lot, because intel is always important in Siege, and having this setting on will allow you to always know the name of the spot you’re in, and with that you’ll be able to issue more specific and accurate callouts. It’ll also allow you to be more familiar with location names and therefore be able to respond to callouts better the next time you play.
How Current Location Solves the Problem:
Allows the player to know the name of the spot he’s current in
Allows the player to issue accurate callouts
Allows the player to memorize location names easier
How to Apply Current Location:
Click Settings
Go to Hud
Make sure that Current Location is on
10. Defuser Reminder
Image
The Problem:
How many times have you lost a round just because you or your teammate forgot that he’s the one carrying the defuser? As for me, there were many. And if the Defuser Reminder is off, chances are, it’ll happen even more often. The Defuser Reminder is a good indicator that tells you that you have the defuser, and therefore, you probably shouldn’t roam alone in the map, and the context of your attack should be based on you carrying it as close to the objective site to perform a plant.
How Defuser Reminder Solves the Problem:
Reminds you that you have the defuser
Reminds you that you shouldn’t stay too far away from your team so that you won’t drop the defuser on places that’ll make it hard for your teammates to retrieve it
How to Apply Defuser Reminder:
Click Settings
Go to Hud
Make sure that the Defuser Reminder is on
9. Gadget Deployment – Advanced
Image
The Problem:
Standard gadget deployment is fast and simple. The problem is that it doesn’t allow you to cancel certain special gadget actions like Thermite’s, which is very important, especially when you’re trying to breach and a player who can perform Bandit trick well is on the opposite side of the wall. With Advanced mode, you can cancel Thermite’s breach charge anytime during deployment, allowing you to trick the trickster.
How Gadget Deployment – Advanced Solves the Problem:
Lets you cancel gadget deployment
Lets you trick your opponents
How to Apply Gadget Deployment – Advanced:
Click Settings:
Go to Controls
Set Gadget Deployment to Advanced
8. Device Area of Effect
Image
The Problem:
With this turned off, you will have to guess the effective range of an operator's special gadget, e.g. Mute’s. Even if you’re a veteran player and already know the range of each device’s range, it doesn’t hurt to just turn this one on and be sure. I’ve been playing Siege for 4 years now and Mute’s gadget range indicator still helps me effectively block drones on stairs. Kaid’s rtilla’s range indicator is also very helpful for jamming multiple walls.
How Device Area of Effect Solves the Problem:
Lets you know the exact effective range of your gadgets
Lets you position or reposition your devices to a better spot
How to Apply Device Area of Effect:
Click Settings
Go to Hud
Make sure that device area of effect is on
7. Pings
Image
The Problem:
Pings from teammates are of major importance in Siege, even when you and your teammates are already using voice comms. Let’s be real, even for veteran players, it’s hard to know all the location names of all the maps in Siege, so it’s sometimes hard to pinpoint the location of the enemy just by describing it with words. Thankfully, Pings are there to help. Pinging the location of the enemy is a very easy way to let your teammates know where the enemy is, or even when you want your teammates to do something, e.g. a rotation hole, you can ping the part of the wall so that your teammate will know the exact spot that you want the rotation whole to be in.
How Pings Solve the Problem:
Lets you tell your teammates where the enemy’s location is, very easily.
Lets you pinpoint areas of the map where you need something to be done to your teammates
Great for overall team coordination and warnings
How to Apply Pings:
Click on Settings
Go to Hud
Make sure that Pings is on
6. Opponent Pings
Image
The Problem:
Intel plays a huge factor in Siege, but sometimes, especially when you’re solo queuing, callouts are hard to come by from random teammates. That is why opponent pings really help. It helps you know the enemy operators that you’ll be dealing with, because each opponent ping will put the opponent operator’s icon on the match header. The most useful thing about it is that, even when your teammates aren’t using voice comms, they can tell you where the enemy is by scanning and pinging them. It's only downside is that your opponent will know that you have intel on him and he will probably destroy the drone or camera, but when used strategically, it can be a very big help to a teammate and can distract the enemy as well.
How Opponent Pings Solve the Problem:
Lets you and your teammate know what operators your enemies are using
Lets you and your teammates know the current location of the enemy
Lets you distract and put some stress on your opponent
How to Apply Opponent Pings:
Click Settings
Go to Hud
Make sure that Opponent Pings is on
5. Contextual Pings
Image
The Problem:
I can’t count how many times I’ve lost a round just because I didn’t know that there was a Kapkan or Frost in the enemy team. Having contextual pings on lets you ping an enemy device and it’ll not only tell you or your team that an enemy device is at the location of the ping, it’ll also make the operator icon whose gadget it’s from appear in the match header. This is especially good for attackers during prep phase, because it’ll let them know what to expect when they penetrate the objective area.
How Contextual Pings Solve the Problem:
Lets you and your team know the location of enemy gadgets
Lets you and your team know the enemy operators that you’ll be facing
Lets you plan your attack better
How to Apply Contextual Pings:
Click Settings
Go to Hud
Make sure that Contextual Pings is on
4. Teammate Icons
Image
The Problem:
If teammate icons are turned off, even if the teammate names and outlines are on, it’ll be hard to get a good picture of how your teammates are going to attack, unless of course you’re in a 5 stack and in discord with a team that has trained together and knows how to attack in a coordinated way. Having teammate icons will let you know more context on the battlefield, and issue specific callouts. E.g. “Thermite, to your left”, or “Thatcher, I’ll cover you”.
How Teammate Icons Solves the Problem:
Lets you coordinate with your team better
Lets you have more context on what your teammates are doing
How to Apply Teammate Icons:
Click Settings
Go to Hud
Make sure that Teammate Icons is on
3. Teammate Outlines
Image
The Problem:
A lot of players turn this off. That is because it can obstruct the view of the enemy at times. And yes, that is annoying and it can make you lose a gunfight. But in my years of experience in Siege, that scenario only happens rarely. And having teammate outlines on more often helps than not. Not only will it prevent you from accidentally killing your teammates because you’ll always know where they are. It’ll also let you know more intel about the fight even when your teammates aren’t issuing callouts, because you’ll be able to see where they’re aiming at.
How Teammate Outlines Solves the Problem:
Lets you know where your teammates are
Prevents you from accidentally killing teammates
Lets you know enemy locations even without your teammates calling it out
How to Apply Teammate Outlines:
Click on Settings
Go to Hud
Make sure that teammate outlines is on
2. Match Timer
Image
The Problem:
I can’t tell you how many rounds went in my Siege lifetime where me and my friends were like: Damn I didn’t notice that time was running out. This is an especially common problem for beginners, but can still happen to veteran players, because oftentimes, there’s so many things happening in Siege that you need to pay attention to that sometimes you forget the time, which is a very important factor in the game. Especially for attackers who need to complete the objective within the given time which is just a few minutes.
How Match Timer Solves the Problem:
Lets you visualize the context of the battlefield better
Lets you plan your mode of attack in conjunction with the remaining time
How to Apply Match Timer:
Go to Settings
Click Hud
Make sure that Match Timer is On
1. Versus Update
Image
The Problem:
It sure can look distracting and obstructive on the screen. But if it’s turned off, it’ll be hard for you to visualize the fight’s landscape without looking up and carefully looking at each team’s ‘x’ marks, taking away your focus in the process. It is much better to leave it on and let the screen reminder let you know how many teammates or enemies are remaining, so that you can react accordingly based on that context.
How Versus Updates Solves the Problem:
Lets you internalize the info without losing focus on your gun’s line of sight
Lets you process intel on the remaining combatants much easier
How to Apply Versus Updates:
Go to Settings
Click Hud
Make sure that Versus Updates is on
Attention operator, please be advised. There is a new directive from Six. Read up on these related articles, and prepare for deployment:
A veteran of thousands of quests. Slayer of trolls. Survived the dragon attack in Loc Muinne. Kristoffer now spends his days as a scribe after receiving a permanent injury when a tavern stool gave und
Gamer Since:
1994
Favorite Genre:
FPS
Currently Playing:
Tom Clancy's Rainbow Six Siege
Top 3 Favorite Games:
Rainbow Six Siege, The Witcher 3: Wild Hunt, Tom Clancy's Ghost Recon: Wildlands