With great deadzones, comes great responsibility!
Rocket League is a fun game that allows you and your friends to drive around in rocket-boosted cars all over a closed field. It seems light-hearted fun at first until you decide to get serious about the game and realize just how complicated and intricate it can be. You try your first aerial and fail miserably. Then, you do as any try-hard player would and search online to copy some pro player settings, only to find them talking about something called “Deadzones”.
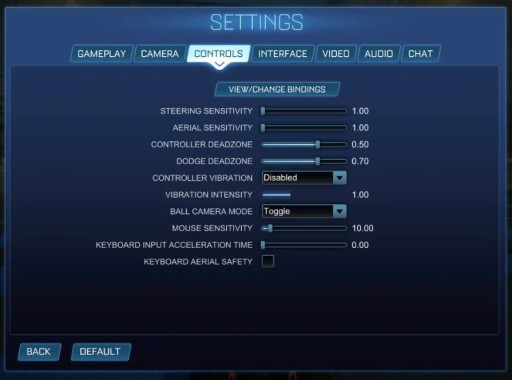
Rocket League Controls Settings
So, what is a deadzone setting to be exact? Well, it basically controls how far you need to move your joystick before an input is registered. If that’s still confusing, think of it this way. It’s a percentage and the number setting you choose is what percentage of the stick you’ll need to move in order to make the car start driving. Let’s take a look at the top 5 best deadzone settings that will help you fix some problems you might be facing in your game.
5. Controller Deadzone
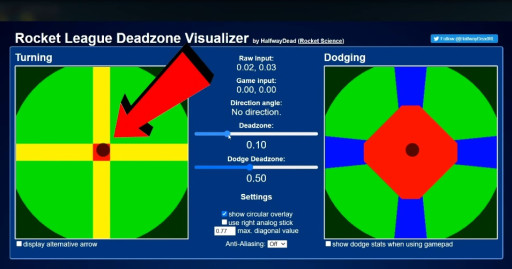
Deadzone Visualizer by Rocket Science
We’ve already explained what a deadzone in Rocket League is. In short, It’s how far you’ll have to move your joystick to get your car to start moving in the direction you chose. To get a little more technical with numbers, you’ll have to know that the higher your deadzone number is, the farther you will need to move your stick, and the longer it’s going to take you to take any action on the field. It’s basically like having game input lag.
A high deadzone number is something like 1.00, which is the max setting. This will make it really difficult for you to pull off any kind of mechanical plays, and it will slow down your speed of play to the point where you’re literally at a disadvantage.
So, to fix this, all you’ll have to do is lower your controller deadzone to somewhere around 0.10 to 0.20. As you can see in the picture above, the small red box now represents the distance with respect to your joystick. This is the distance you’ll have to move your joystick, and it will result in near-instantaneous game movement.
4. Controller Deadzone (Diagonal Mechanics)
Deadzone Visualizer by Rocket Science
You’re probably wondering why I’m talking about the controller deadzone again, but there’s more to it than speed. Accuracy is a big part of our mechanical plays in Rocket League. Sometimes, pressing the right buttons fast enough isn’t going to cut it.
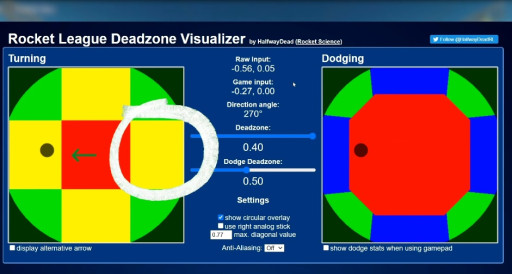
In the picture above, you’ll see we have a higher controller deadzone set. If you compare it to the previous picture, you’ll notice that the yellow boxes increased along with the red box. This yellow box is the “true direction” section which translates into turning completely left, right, up, or down. Basically, there is no diagonal motion when your joystick is aimed at these yellow boxes, and in Rocket League, mechanical plays such as speed flips, half flips, and flip cancels require diagonal movement.
So, in general, having too high of a deadzone can make the yellow true direction sections too large to the point where they compress the diagonal “Green Zones” that allow you to drive and flip diagonally. It really decreases accuracy, and you’ll never get past platinum probably.
3. Controller Deadzone (Stick Drift)
If you haven’t heard of stick drift yet, you should count your blessings. It means you’ve been taking good care of your controller. Stick drift is basically when your joystick becomes a little worn out after years of usage, and the inner sensor starts getting a little shaky which causes your joystick to move fractionally without touching it.
Firstly, to check if you have stick drift, set your controller deadzone to 0.00, go into one of your game replays, set the camera on “fly” mode, and let go of your joystick. If the camera starts flying on its own, you have some stick drift, unfortunately.
To fix this, all you have to do is keep increasing the controller deadzone by 0.01 until the camera doesn’t move on its own anymore. Normally, the default setting for this is 0.20, but this compensates too much for the drift. I found that 0.10, and even 0.05 which is the most popular among pro players, is usually the sweet spot for even old worn-out controllers.
2. Dodge Deadzone
The dodge deadzone works mechanically with the same logic as the controller deadzone does. However, it controls how far to move your stick before the game registers your 2nd neutral jump into a front, back, or side flip.
Essentially, this is used to fix one main problem which is accidental backflipping when trying to fast aerial. In a fast aerial, you want to be up in the air in a split second. When you jump the first time, you’ll need to loosen your thumb off of the joystick before jumping the second time, or else, the game will understand that you’re trying to flip.
Setting the dodge deadzone at somewhere around 0.50 or 0.60, which is what most pro players use, will eliminate that.
1. Steering and Aerial Sensitivity
Sensitivity isn’t the same as deadzone sensitivity, but they’re closely related when it comes to joystick movement. These 2 settings control how fast you accelerate in those directions. A higher sensitivity, like a max of 10.00, means when you barely move the joystick, the full range of motion your car and its wheels are capable of will immediately activate. It’s like flipping on a light switch. It might seem like a good idea, but in reality, it makes it impossible to make small adjustments.
On the flip side, with a minimum sensitivity of like 1.00, you can go into training, stand still, look at your wheels from the side, and notice just how much time it takes to register the full range of movement or turn. At 1.00, it’s like pulling a lever, with the lever being your joystick here, as compared to the instant light bulb.
The best solution here is to find a middle ground after you understand what these settings do. None of the pro players go over 2.00 on either aerial and steering sensitivity, and I’d recommend you choose both of them as the same value when you’re starting out. I’d personally recommend 1.50 or slightly less, as even the majority of pro players use these settings. It’s all down to preference in the end.
You may also be interested in:
- Top 15 Rocket League Tips For Outplaying Your Opponents
- 15 Best Rocket League Settings That Give You an Advantage
- Top 10 Rocket League Best Plays (2020)
- [Top 10] Rocket League Best Players In The World Today
- [Top 10] Rocket League Best Car Designs
- Top 5 Rocket League Best Cars
- Best Wheels In Rocket League That Look Freakin Awesome
- Top 5 Rocket League Best Crates

