Hello again, fellas! As you may know, CS:GO is a game where even the slightest of edges tips advantages in one party’s favor. That party is always your enemy, and never you. But that’s okay. The default settings are actually not enough and without optimizing them, it is rather difficult for us to get those mini-advantages. But I’m here to change all of that.
Video Settings are the most relevant and are at the top of the CS:GO Settings Pyramid. The others are obviously important, but not as much as Video Settings.
So here I am, trying to put some Setting sense into your skulls.
Without further ado, let’s get into it. We’ll talk about each and every setting and I will give you a brief explanation of the weird ones. Many will be based on taste, too. Anyway, let’s start.
Basic Video Settings:
20. Main Menu Background Scenery
Needless to say, this setting is purely based on taste. If you feel you spend a lot of time hanging out at the Main Menu, either see a CS:GO doctor or just try out the options one by one and see what you like. I personally have set it to Random. I don’t care.
- Go to Game Settings at the bottom of the icons at the left.
- Go to Video; it’s the second option at the top
- The first option under Video is Main Menu Background Scenery that you can adjust
19. Color Mode
There are only two options: Computer Monitor and Television. Most of us play on Computer Monitors so just set it to that. Not much to explain.
- Go to Game Settings at the bottom of the icons at the left.
- Go to Video; it’s the second option at the top
- The second option under Video is Color Mode that you can adjust
18. Brightness
It depends on your comfort. You have to balance between not going blind and not having key information denied. I highly recommend you to check out each brightness level starting from 80% to 130% and see what fits you best.
- Go to Game Settings at the bottom of the icons at the left.
- Go to Video; it’s the second option on the top
- The third option downwards will be Brightness that you can adjust.
17. Aspect Ratio
There have been near-infinite discussions on this by now and I’m sure you yourself have pondered on it. If you have not, lemme just summarize it. There are practically two options: 4:3 and 16:9.
4:3 will save you some FPS. 16:9 will give you a wider field of view.
4:3 will give you either Blackbars or stretch your screen, widening the enemies’ viewmodels. (Their horizontal velocity increases as well, so it is actually down to Placebo if you feel you hit better shots in 4:3 Stretched.)
16:9 gives a wider field of view but it doesn’t exactly matter in-game because if someone creeps up on you from that far away, you’re not gonna turn into kennyS and flick your opponent out of the server. You’ll die. Maybe you’ll not be knifed. But you’ll still die. RIP You.
There’s no right or wrong answer. Test both out and pick one. Most pros use 4:3. Just saying.
- Go to Game Settings at the bottom of the icons at the left.
- Go to Video; it’s the second option on the top
- The fourth option downwards will be Aspect Ratio that you can adjust.
16. Resolution
The spouse of Aspect Ratio is Resolution.
If you are using 4:3 Aspect Ratio, you have two practical choices: 1280 X 960 and 1024 X 768. The former will cost a few more frames. Have your pick amongst the two based on your FPS number.
If you are using 16:9 Aspect Ratio, 1920 X 1080 is for you. Use this combo if you have a good, fast PC.
The default 4:3 + 1280 X 960 is rather fine, otherwise.
Here is a little more detailed article about Resolution (combined with Aspect Ratio, again) for you: [Top 3] CSGO Best Resolution - Which Should You Use?
- Go to Game Settings at the bottom of the icons at the left.
- Go to Video; it’s the second option on the top
- The fifth option downwards will be Resolution that you can adjust.
15. Display Mode
This again depends on you. (Our relationship is not healthy. Why is it always about you?) Well, Fullscreen Windowed costs a few frames. Fullscreen should be perfectly fine for you. Change to Windowed if you feel otherwise.
- Go to Game Settings at the bottom of the icons at the left.
- Go to Video; it’s the second option on the top
- The sixth option downwards will be Display Mode that you can adjust.
14. Laptop Power Savings
You are most probably using a PC. A bad one, I bet. Anyway, no reason to keep this Enabled. Don’t enable it even if you’re on a laptop. Just connect the laptop to the charger and play. Enabling this will worsen your already bad performance so much that it won’t even be worth playing at that point.
- Go to Game Settings at the bottom of the icons at the left.
- Go to Video; it’s the second option on the top
- The seventh option downwards will be Laptop Power Savings that you can keep disabled.
Okay, enough of this. Let’s move on to the real stuff: Advanced Video Settings.
13. Global Shadow Quality
Having this on Low makes the shadows blurry. More importantly, having this setting on Low means that at any reasonable distance, shadows of enemies disappear. This clearly means there’s a loss of information. I recommend you to keep this on High or Medium. There’s not much difference between Medium and High in shadow quality but there is a significant difference between the FPS count.
Global Shadow Quality on Low:
Low Distance: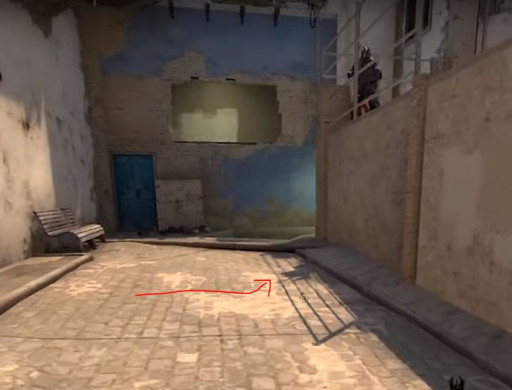
Medium Distance: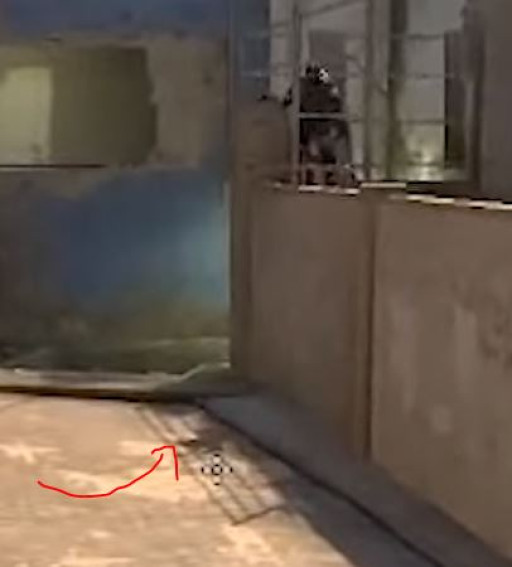
High Distance: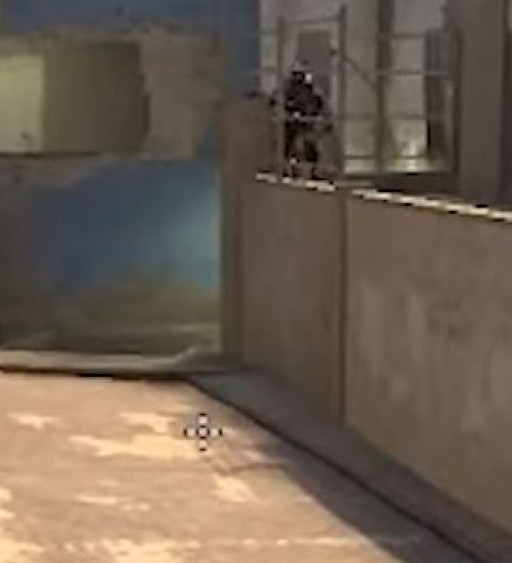
See? Shadows Disappear
Global Shadow Quality on High:
High Distance: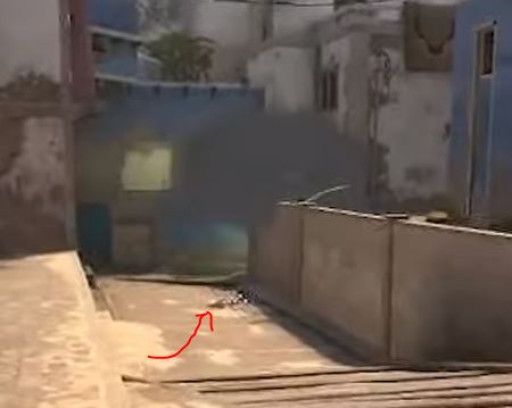
Shadows don't disappear, even at high distances. Even through smokes. Don't know how, but okay.
Having this on Medium is a safe bet but if you’re sure that your PC is good i.e., it is high-end, then High is the way to go.
· Go to Game Settings at the bottom of the icons at the left.
· Go to Video; it’s the second option on the top
· The first option under ‘Advanced Video’ is Global Shadow Quality that you can adjust.
12. Model/Texture Detail
This setting is entirely graphical and doesn’t cost much FPS, either. Some will recommend Low, others High. No real drawbacks mean you can go for High and play the game while having it look slightly better.
- Go to Game Settings at the bottom of the icons at the left.
- Go to Video; it’s the second option on the top
- The second option under ‘Advanced Video’ is Model/Texture Detail that you can adjust.
11. Texture Streaming
Ah, the interesting one that everyone ignores. First off, if your PC is high-end or even medium quality, then Texture Streaming, Enabled or Disabled, will make no difference. So you can leave it at default and move on now. If you have an ancient PC, then read on.
When Texture Streaming is Enabled, it’ll load high-res textures as you move along the map. This is meant to boost performance. But the thing is that if you have such a low-end PC that enabling this option boosts your performance, then you shouldn’t be indulging in high-res textures in the first place. If for some reason, you still are adamant on that, I recommend you to Enable Texture Streaming.
- Go to Game Settings at the bottom of the icons at the left.
- Go to Video; it’s the second option on the top
- The third option under ‘Advanced Video’ is Texture Streaming that you can adjust.
10. Effect Detail and Shader Detail
Okay. Let’s get serious about this. First of all, if you have no FPS issues, turn both to High or Very High and blindly move on. Seriously. Let me explain now.
They are married. Turning Effect Detail to High and Shader Detail to Low would essentially put Effect Detail to Low.
As to what they really do is that they help you look through molotovs’ smoke much more easily. You can spot a CT more easily behind a molly’s smoke if you have those two settings at High.
Check this pic out: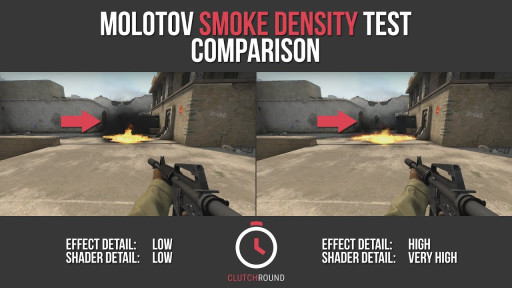
It costs relatively hefty FPS though so if you are on an FPS savingmode, these options are good for you to save some frames for yourself. My recommendation? Keep them at High and Very High respectively for that extra competitive edge.
- Go to Game Settings at the bottom of the icons at the left.
- Go to Video; it’s the second option on the top
- The fourth and fifth options under ‘Advanced Video’ are Effect Detail and Shader Detail that you can adjust
9. Boost Player Contrast
Self-explanatory, friends. This setting boosts player contrast w.r.t. their surroundings. In most scenarios, it makes no real difference but there are indeed cases where it does.
For example, this one: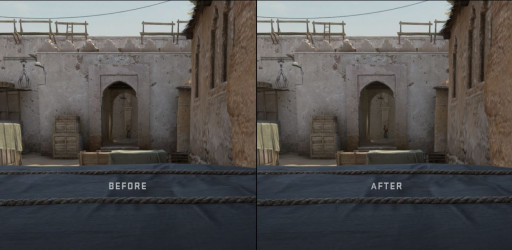
And this one too: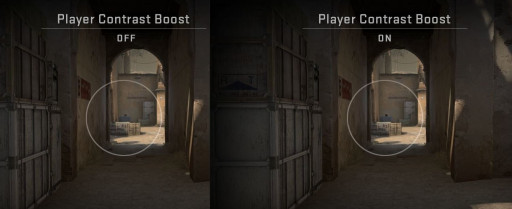
This is a must-have, in my opinion. I recommend Enabling this setting. Caution? 1-3% FPS drop.
- Go to Game Settings at the bottom of the icons at the left.
- Go to Video; it’s the second option on the top
- The sixth option under ‘Advanced Video’ is Boost Player Contrast that you can Enable
8. Multicore Rendering
You won’t ever make a simpler decision in your life. If you have a multi-core processor, which you most definitely do, then Enabling this is a Christmastime FPS gift. Disabling will cost around 50% of the normal FPS. I don’t think you need any more convincing.
- Go to Game Settings at the bottom of the icons at the left.
- Go to Video; it’s the second option on the top
- The seventh option under ‘Advanced Video’ is Multicore Rendering that you can Enable.
7. Multisampling Anti-Aliasing Mode
This basically sharpens your edges. The map’s edges, I mean. No FPS cost. 8x MSAA Easy. Or not. Your choice. It’s entirely graphical, so of course, it depends on you. Disable it if, for some reason, it harms your game.
- Go to Game Settings at the bottom of the icons at the left.
- Go to Video; it’s the second option on the top
- The eighth option under ‘Advanced Video’ is Multisampling Anti-Aliasing Mode that you can adjust.
6. FXAA Anti-Aliasing
Ah, the broken one. It’s been several months now that people have reported that this setting doesn’t work. Who cares, we got more important stuff to look into. Just disable. Or enable, but warning: you enabling will still look like it’s disabled.
- Go to Game Settings at the bottom of the icons at the left.
- Go to Video; it’s the second option on the top
- The ninth option under ‘Advanced Video’ is FXAA Anti-Aliasing that you can disable.
5. Texture Filtering Mode
Look at this pic.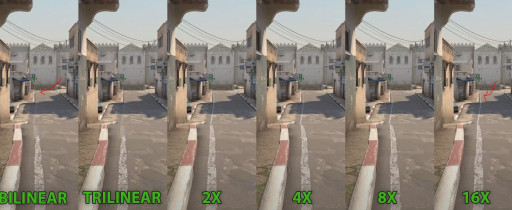
16x Anisotropic will load those funny little lines at the far end of the map better. Some wall textures too. The most important part is that there is no FPS difference between any of the options so you can play around. Just make a coin toss. Heads for Anisotropic 16x. Tails for Bilinear. The middle ones are not worthy.
- Go to Game Settings at the bottom of the icons at the left.
- Go to Video; it’s the second option on the top
- The tenth option under ‘Advanced Video’ is Texture Filtering Mode that you can adjust.
4. Wait For Vertical Sync
Can you just… can you just please do both of us a favor and disable this? It’s more useless than R8. Alright, more seriously. Use it in only 3 possible scenarios:
1. When you’re using GSYNC/FREESYNC
2. You are experiencing Screen Tearing
3. Your GPU is at 100% use
For almost all of us, it’s a given to keep this disabled.
- Go to Game Settings at the bottom of the icons at the left.
- Go to Video; it’s the second option on the top
- The eleventh option under ‘Advanced Video’ is Wait For Vertical Sync that you can adjust.
3. Motion Blur
This setting is, like you, not in a relationship. But if it has to be in one, it could be with FXAA Anti-Aliasing. You guessed it right. Motion Blur is broken. It doesn’t work. Move on. Disable it and… just move on.
- Go to Game Settings at the bottom of the icons at the left.
- Go to Video; it’s the second option on the top
- The twelfth option under ‘Advanced Video’ is Motion Blur that you can adjust.
2. Triple Monitor Mode
For most of us, this option is not relevant because we play on a single monitor. If you do play on a triple monitor mode, Enable it. Or else keep it Disabled. Not difficult.
- Go to Game Settings at the bottom of the icons at the left.
- Go to Video; it’s the second option on the top
- The thirteenth option under ‘Advanced Video’ is Triple Monitor Mode that you can disable.
1. Use Uber Shaders
This setting is rather complicated. It’s basically designed to boost performance by reducing stuttering and hitching. It is recommended to keep this enabled, but if you have a good PC, you might not even notice any differences. There is no FPS difference between enabled and disabled. On some very old PCs, you might see negative differences and, in that case, you can disable it. Generally, keeping it enabled is okay.
- Go to Game Settings at the bottom of the icons at the left.
- Go to Video; it’s the second option on the top
- The fourteenth option under ‘Advanced Video’ is Use Uber Shaders that you can enable.
You may also be interested in:
- [Top 10] CSGO Best Weapons Used By Pros
- [Top 10] CSGO Deagle Skins That Look Freakin Awesome!
- CSGO Best FPS Settings That Give You An Advantage
- CSGO Best Video Settings That Give You An Advantage
- CSGO Best HUD Settings That Give You An Advantage
- [Top 10] CSGO Best eDPI (Used By The Best Players In The World)
- [Top 10] CSGO Best AWP Players In The World Right Now
- [Top 15] CSGO Best AWP Skins That Look Freakin Awesome!
- Top 15 CS:GO Best Cheap Skins
- Top 10 CS:GO Best Knife Animations
- [Top 10] CSGO Best Knife Skins That Are Freakin Awesome!
- The Best CS:GO Tips - How to Become a Killing Spree Machine
- [Top 10] CS:GO Twitch Streamers
- The 10 Best Riflers In CS:GO
- [Top 15] CSGO Best Aimers


