
Real life voices; frequency is positioned using the difference in sound level and the duration of the sound between the two ears. CS:GO uses stereo sounds, and the change in volume is the only variable you can use to detect position. The sounds you hear on CS:GO, are on a plane. So you can hear the sounds behind you, in front of you, to your right and to your left. However, in order to position your enemies, you need to know the map well and recognize different sound textures such as brick, wood, snow, metal. If you want to be better than other players, you should have a few different sound settings. These are the best settings that give players an advantage.
1) In-game Settings
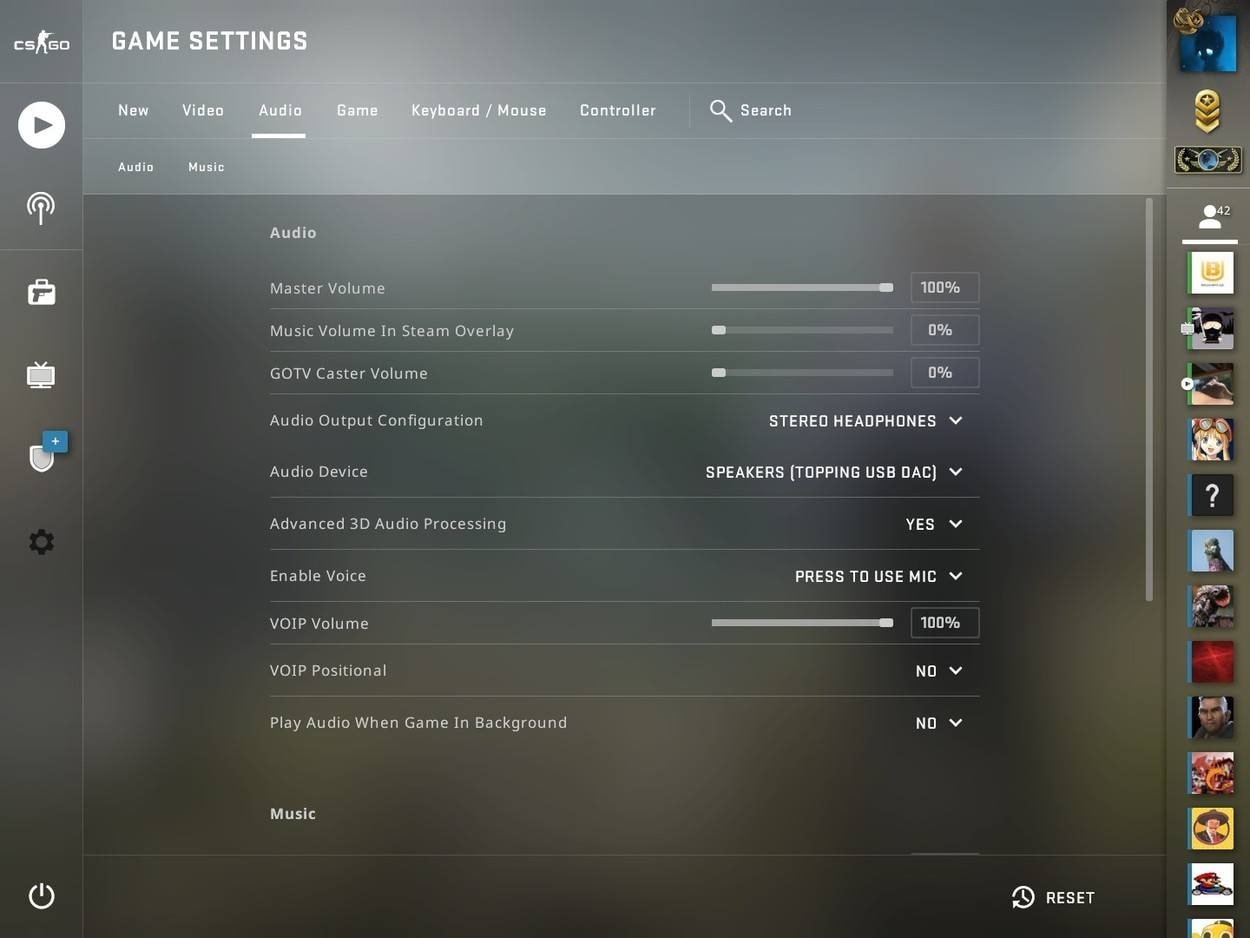
‘Master Volume’ is mostly your own preference. However, in case you use a DAC/AMP combo, it’s better to maximize this setting and just to change the volume on your amplifier. Whatever setup you have, you want your actual volume output level set at a sufficient level to hear footsteps well in advance, while making sure not to listen at a volume that is too high, as this will only damage your hearing.
The very first in-game setting that needs to be adjusted is putting your audio output to “Stereo” and to disable “Advanced 3D Audio Processing”. Make sure that your sound card drivers and Windows Settings are also set to Stereo. The most commonly used audio format in CS:GO is also 16-bit with 44100 Hz, so make sure to adjust your settings in Windows for that.
2) Windows Settings
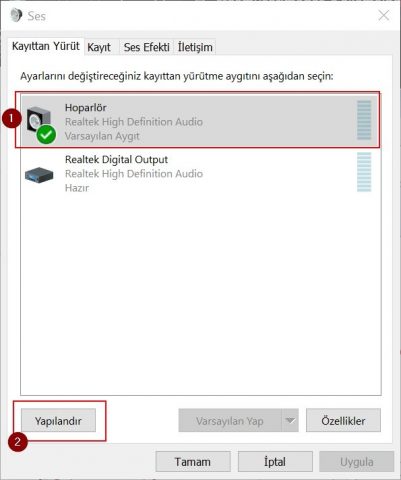
First, you have to set up your headset via Windows. To do this, first open the control panel window by typing "control panel" in the search field. In the Hardware and Sound category, click Sound. In the window that appears, select your default audio device and click “Configure.”
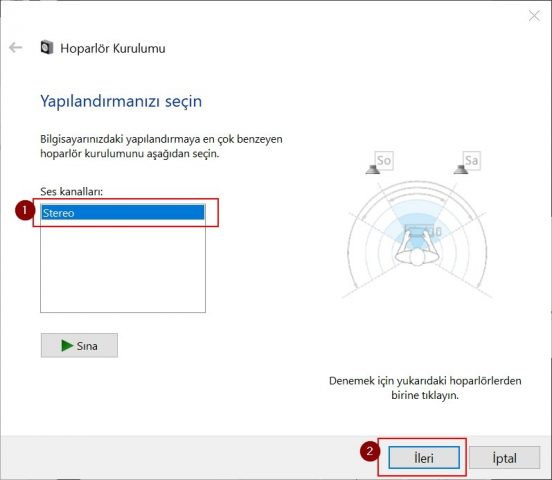
Make sure "Stereo" is selected and press "Next”.
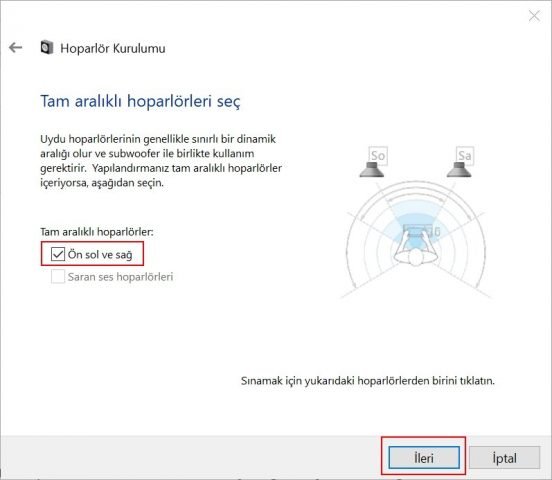
From the full-range speakers selection screen, check the “Front left and right” options and click next. Then finalize the configuration.
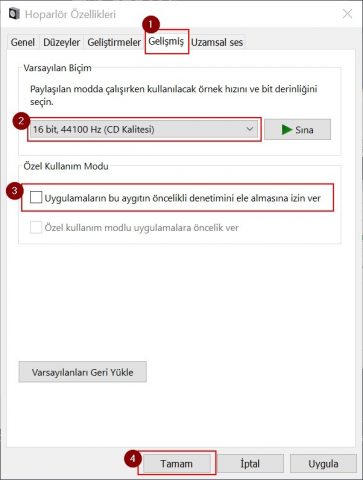
Click “Advanced” and choose “16 bit, 44100 Hz (CD Quality)” as the default format. Higher sound quality may not be perceived by your ears, and CPU usage may increase slightly at higher settings.
Then uncheck the "Allow applications to take priority control of this device" option in exclusive mode. In this way, you prevent sound problems that may occur.
3) Console Commands
volume “0.2” --> This setting is the general volume slider for all sound. You can adjust it up to “1” according to your own preference.
voice_enable “1” --> This enables voice chat with other players. If you set it to “0” you disable the voice chat.
voice_scale “0.5” --> This value determines how loud your player’s communication will be played. You can freely adjust this between “0” and “1” but if you put a higher value on it, you won’t hear as much game sounds as long as a teammate is talking.
windows_speaker_config “0” --> This setting disables your speaker configuration.
snd_surround_speakers “0” --> This setting disables your surround speaker configuration
snd_tensecondwarning_volume “1” --> Used to adjust the volume of the last ten seconds alert.
Commands that disable unnecessary music:
snd_musicvolume “0”
snd_menumusic_volume “0”--> The volume of the music in the game menu. You can change it as you wish.
snd_roundend_volume “0.2”--> The notification sound that you can guess whether you should use the kit to defuse the bomb. You can test this sound by playing with bots.
snd_roundstart_volume “0.06” --> Used to adjust the volume played at the start of the round.
snd_deathcamera_volume “0”--> You can change the “Death Cam” sound to your liking.
snd_mapobjective_volume “0”--> You can use such a low value so that notifications do not block enemy sounds.
Commands that improve orientation:
snd_front_headphone_position “xx.x” // Replace the “xx.x” with your screen resolution (e.g: 43.2 for 5:4 or 45.0 for 4.3 or 50.2 for 16:10 or 53.2 for 16:9)
snd_rear_headphone_position “90.0” --> Small adjustments here can give you a better idea on the direction from which the sound comes from.
snd_headphone_pan_exponent “1.2” // Sounds over medium or long distances are louder without affecting close sound cues.
snd_headphone_pan_radial_weight “0.5” --> Makes it easier to locate sounds due to increases or decreases in volume.
4) Making Driver Settings
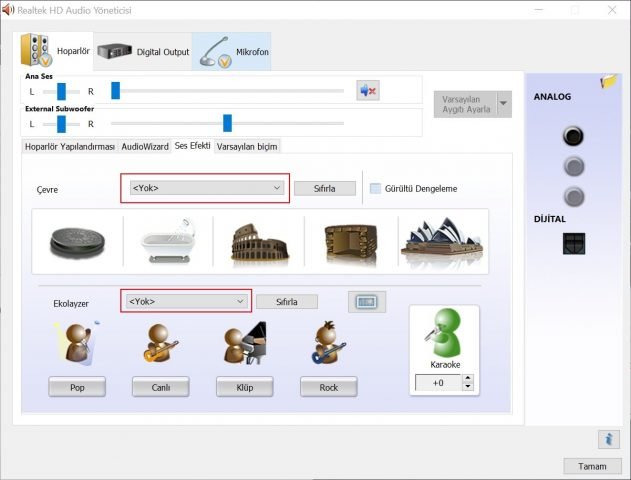
It is possible to encounter different settings depending on the model of your audio device. But in general, disable all sound effects and digital features. In this way, you reduce processing times, perform better sound positioning, increase dynamic sound integrity and prevent possible sound distortions.
5) Set a Conversations Mute Button
You can assign a shortcut to mute the sound temporarily, especially if your team is talking too much, and you don't understand what you're hearing. For this, after opening the console in the game, you can enter the following command.
bind "KP_MINUS" "toggle voice_enable 1 0”
This command allows the “-” sign on the Keypad to turn your team's conversations on and off. Moreover, when you make this assignment, your team will not be notified that you have closed and opened the conversations during the game. If you want to send a notification to your team, you can use the command below to turn the O and P keys on and off by entering the console.
bind "O" "voice_enable 0; say_team Voice-Off"; bind "P" "voice_enable 1; say_team Voice-On"

6) Headset
To get the best results; In addition to using the correct in-game settings, console commands, you should also have a quality headset and microphone. Do not use speakers and earbuds, as they may not allow you to clearly understand their position in-game. A sound card coupled with a good headset is worth its money in CS:GO.
You need to look for something with adequate noise cancellation, so you can stay focused on the game. Ideally, your headset must have support for virtual surround sound (preferably 7.1) to help you find out where in-game sounds are coming from. Fortunately, there are plenty of great options out there that are available for a fairly reasonable price.
Make sure that your headset is also connected to your sound card and not just connected to your main board.
7) 3D Sound Processing Setting
The best side of this setting is lowering the unnecessary sound. Sound levels are significantly subjective, and setting them right requires a bit of balancing. For example, voice chat should be loud enough to make sure you hear callouts right without drowning out important sound cues such as footsteps, weapons reloading, or the bomb being defused. While you can set most of the music settings to zero, you should keep the “Ten Second Warning” set to at least 10 – 25% to keep you on your toes for a last-moment clutch.
Game Settings > Sound Settings > Advanced 3D Sound Processing "ON"
There are many factors that bring success in CS GO. Proper sound settings are one of the important conditions on this road.


