 Home
Home PC Game Trailers
 News
News Menu
Menu[Top 10] Warframe - Best Warframes And How To Get Them (2022 Edition)
Updated: 13 Jun 2023 7:09 pm
 BY: Erica Ziegler-Smith
Currently, there are 48 different types of Warframe to choose from, not counting their stat enhanced Prime and Umbra variants. Each has their own unique power set and excels at different things. This can make choosing the right frame for the job feel a little overwhelming. Well, the truth is that thanks to the mod system’s ability to enhance your frame in various ways, you can make almost any frame work on any mission!
But what if you’re just starting out and you don’t have those fancy mods yet? You’re struggling with a certain aspect of the game and want to make things just that little bit easier? It’s true that some frames are just better at certain things than others. So here - in no particular order - are the top ten frames that excel at what they do, and why.
10. Nekros (Best for Farming)
 This is Nekros, manipulator of souls.
Nekros is inspired by the necromancer archetype, with his abilities themed around undeath. His ‘Soul Punch’ hits so hard the soul becomes a projectile, whilst ‘Terrify’ causes the enemy to flee. Naturally, he can raise his own little army from the bodies of his slain foes using ‘Shadows of the Dead’. His passive means just being around when something dies makes him gain a bit of health back. But it’s his third ability, ‘Desecrate’, that has earned Nekros his place on this list.
Warframe is known for its huge arsenal of weapons, frames, and companions, but to access them you need to build them. To build them you need the components. This can make the game feel extremely grindy. ‘Desecrate’ makes life a little bit easier for you and everyone on your team by causing all enemies within range to provide another drop, the source of most components in the game. These drops are pulled independently from the drop table, so this technically doubles your chances of getting rarer drops, such as toroids, and rare mods. What’s more, combining ‘Desecrate’ with slash damage creates more body parts for loot to drop from.
Nekros is the only frame in the game that can affect drops without mods and is by far the easiest to use – just activate the ability and reap the rewards!
What Nekros Excels In:
- Increasing the amount you get from missions, including rare drops
- Bolstering your team with reanimated foes for a time, taking the pressure off you
- Survival and Excavation missions – ‘Desecrate’ increases life support and power cell drops
How to Get Nekros: Nekros’ Blueprint can be purchased from the Market for 100,000 credits. His Neuroptics, Chassis, and Systems are all dropped by Lephantis Assassination on Maganacidium (Deimos).
9. Trinity (Best for Healing)
 This is Trinity. The healer. The equalizer.
Trinity is a healer, first and foremost, but that doesn’t make her playstyle any less engaging. Whilst her ‘Well of Life’ is lackluster, requiring you to target and then damage an enemy for negligible health gains, the rest of her kit all contributes towards making her the best support frame in the game. ‘Energy Vampire’ turns a targeted foe into a battery, giving energy to the whole team gradually if left alive, or immediately upon death. With the right timing, a team with a Trinity is never without energy, making her a desirable addition to any formation.
As if that wasn’t enough, ‘Link’ negates damage and passes it on to the enemy tethered to the other end, including status effects, whilst ‘Blessing’ restores health and shields to everyone within affinity range. Finally, Trinity’s passive allows you to revive any downed players 25% faster, so even if someone does go down, you can get them back up faster than anyone else. This all combines to make a frame that is not only survivable but can keep the rest of the team alive and supplied with that sweet sweet energy to keep wreaking havoc with unmatched efficiency.
What Trinity Excels In:
- Healing, providing energy, and mitigating damage
- Playing with pets – her abilities extend to them
- Rescue and Syndicate missions with Operatives, missions with Drones, and Eidolon hunting – Trinity can heal lures, drones, and operatives too!
How to Get Trinity: Trinity’s Blueprint can be purchased from the Market for 25,000 credits. Her Neuroptics, Chassis and Systems are all dropped by Ambulas Assassination on Hades (Pluto).
8. Mesa (Best for Room Clearing Damage)
 This is Mesa, the vagabond, the outcast.
Mesa is a gunslinger, wielding her exalted dual pistols the Regulators with deadly accuracy and speed. If you want to wipe out a room of enemies as quickly as possible, her fourth ability, ‘Peacemaker’, is your go-to. Simply activate the ability, hold your shooting button, and Mesa will whip out her Regulators and shoot every enemy in her reticule at ridiculous speeds. The area of focus grows narrower but more powerful, the longer she is in this mode, so for a particularly efficient enemy clear it’s advised to deactivate and reactivate the ability.
The rest of her kit synergizes well with ‘Peacemaker’. ‘Ballistic Battery’ stores up gun damage upon activation and on reuse channels it all into one shot. This lets you take advantage of the rapid damage output of ‘Peacemaker’ and focus it on a single target. ‘Shooting Gallery’ boosts an ally’s damage whilst jamming enemy guns and stunning melee users, and ‘Shatter Shield’ creates a bullet- and status-reflecting barrier around her. Together these two abilities effectively protect an unmoving Mesa as she perches up on high to get the best view of the battlefield.
What Mesa Excels In:
- Quickly dispatching waves of enemies
- Improving your sidearm play – her kit supports them too, and her passive makes firing dual sidearms and reloading single sidearms faster
- Defense and Mobile Defense missions - Mesa has limited mobility whilst in ‘Peacemaker’ and needs to see an enemy to kill them, but that’s not an issue if they’re all heading to one particular spot!
How to Get Mesa: Mesa’s Blueprint can be purchased from the Market for 30,000 credits. Her Neuroptics, Chassis and Systems are all dropped by Mutalist Alad V Assassination. To access this fight, you need to craft Mutalist Alad V Assassinate Keys, awarded by the Patient Zero quest and the boss unlocked by the Jordas Precept quest.
7. Saryn (Best for Spread Damage)
 This is Saryn, elusive and deadly.
Saryn is the second frame that has earned their place on this list from their sheer damage output. Whilst Mesa provides bursts of damage to all foes in sight, Saryn is built around status-based damage on clustered groups. Her first ability, ‘Spore’, afflicts a target with a corrosive pox which spreads to surrounding enemies upon their death. The spores’ damage increases over time as they continue to be spread. Her fourth ability, ‘Miasma’, spreads viral damage to all enemies within range and is even more effective on those with spores. With this Saryn can explosively dispatch large groups of enemies and spread her spores even faster.
Saryn spends a lot of time running around in search of new victims to infect, ideally in large groups to maximize the potential spread. Her third ability, ‘Toxic Lash’, adds toxic damage to Saryn’s attacks. The effect is doubled for melee weapons and instantly pops any spores, allowing Saryn to further propagate her damage and encouraging you to constantly flit around the battlefield. If things start looking a little dicey, her second ability, ‘Molt’, creates a decoy and gives Saryn a speed boost for a quick escape. Top all this off with Saryn’s passive which makes status effects last 25% longer, and you have a deadly spreader of disease at your disposal.
What Saryn Excels In:
- Spreading status effects across large groups of enemies
- Dealing with enemies with high armor, such as Grineer and Fossilized Infested – corrosive damage degrades armor, making Saryn particularly deadly here
- Sanctuary Onslaught – Saryn’s spores can spread rapidly here as continuously spawning enemies cluster together in small enclosed spaces
How to Get Saryn: Saryn’s Blueprint can be purchased from the Market for 35,000 credits. Her Neuroptics, Chassis and Systems are all dropped by Kela De Thaym Assassination on Merrow (Sedna).
6. Nidus (Best for Sustainability)
 This is Nidus, the adaptive, the scourge.
Nidus is based on the Infestation faction, and much like them, he’s very tough to get rid of. There are a number of frames you could argue are tankier – Rhino, Wukong, and Valkyr all have abilities which make them invulnerable for a time, just to name a few. But these abilities require energy, so you have to manage their use carefully. Nidus on the other hand is less reliant on energy, as his third, fourth, and passive abilities rely on his unique resource, mutation stacks.
So what makes Nidus survivable? Nidus can store up to 100 mutation stacks/ If he has enough to pay the cost, a dying Nidus will automatically be restored to half health with a few seconds of invulnerability. ‘Parasitic Link’, Nidus’ third ability, allows him to link with allies to boost both the host’s and Nidus’ damage. Alternatively, he can link with an enemy to share damage with them, partially mitigating it. Nidus also has some of the highest armor and health base stats at the cost of having no shields, instead passively regenerating health over time.
To start building mutation stacks, Nidus needs to use his first or second ability. ‘Virulence’ creates a line of fungal growth in front of Nidus. The growth damages enemies and steals energy from them, with the effect becoming strong for every five enemies hit. If used on a large enough group of enemies, this attack will provide more energy than it uses, making this an excellent opener. Each enemy hit also contributes a fifth of a mutation stack. His second ability, ‘Larva’, spawns a pod which draws in nearby enemies, making it easier to hit groups. If killed whilst held, an enemy also has a 50% of providing a fifth of a mutation stack.
His fourth ability, ‘Ravenous’, uses up stacks to produce maggots, which latch onto enemies and do damage over time. If hit by ‘Virulence’, the maggots burst, doing blast damage. The maggots are stronger the more mutation stacks Nidus has, and add a fifth of a stack with each enemy hit when they burst. All of this makes Nidus very effective at sustaining his damage output whilst staying alive.
What Nidus Excels In:
- No Shield Nightmare Mode and carrying the Decaying Dragon Key – Nidus has no shields to affect
- Survival – Nidus requires relatively few resources to keep going against large groups of enemies
How to Get Nidus: Nidus’ Blueprint is acquired from The Glast Gambit quest, and subsequently bought from Cephalon Simaris for 50,000 standing. His Neuroptics, Chassis, and Systems are all dropped from Rotation C for Infested Salvage on Oestrus (Eris).
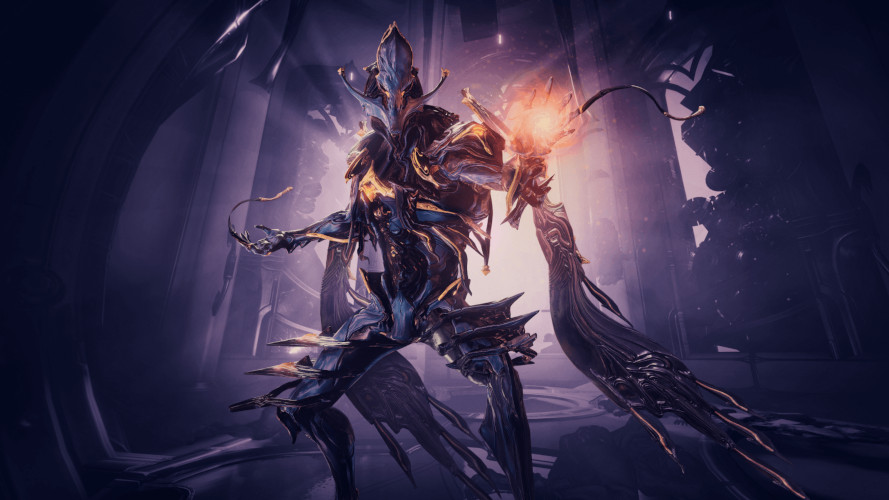
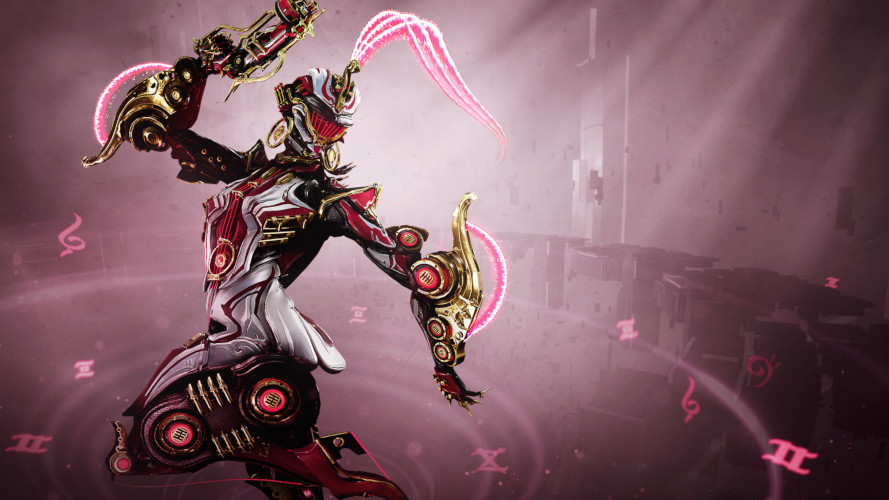
5. Revenant (Best for Turning the Enemy Against One Another)
 This is Revenant, the returned - the condemned.
Revenant excels at turning enemies into thralls,then using and abusing them. Enemies converted by his first ability, ‘Enthrall’, damage and enthral their former allies, and remain under his spell until his ability runs out. Thralls lose any buffs they had, making them easier to deal with than other enemies. If still enthralled when killed, they become damaging pillars of light. This means Revenant can effectively use the enemies’ strength against them whilst reducing the number they have to deal with.
‘Mesmer Skin’ redirects attacks aimed at Revenant and stuns attacking enemies – and as a nice bonus, any stunned enemies can be enthralled at no energy cost, making converting even easier. His third ability, ‘Reave’, sends Revenant dashing through enemies, leeching health and shields from those he passes through. Casting this ability on a thrall restores ‘Mesmer Skin’ charges, whilst dashing through them leeches more effectively, benefiting Revenant and making them even easier to finish off simultaneously.
Not content with just using his thralls, Revenant’s fourth ability is the heavy hitting ‘Danse Macabre’. Revenant twirls as energy beams blast forth, their damage type adjusted to the enemy. Whilst in this mode, incoming damage is redirected to the beams, making it both an offensive and defensive ability. Damage and status effects can be enhanced at the cost of energy by holding fire, and beams will detonate any pillars of lights produced by dead thralls, combining nicely with ‘Enthrall’. His passive acts as another small source of damage and defense, with a damaging shockwave that causes knockback every time his shields are depleted.
What Revenant Excels In:
- Reducing the number of enemies whilst bolstering your team
- Fighting enemies drawn from multiple factions
How to Get Revenant: Revenant’s Blueprint is acquired from the Mask of the Revenant quest, and subsequently bought from Cephalon Simaris for 50,000 standing. His Neuroptics, Chassis, and Systems are acquired from Plains of Eidolon Bounties.
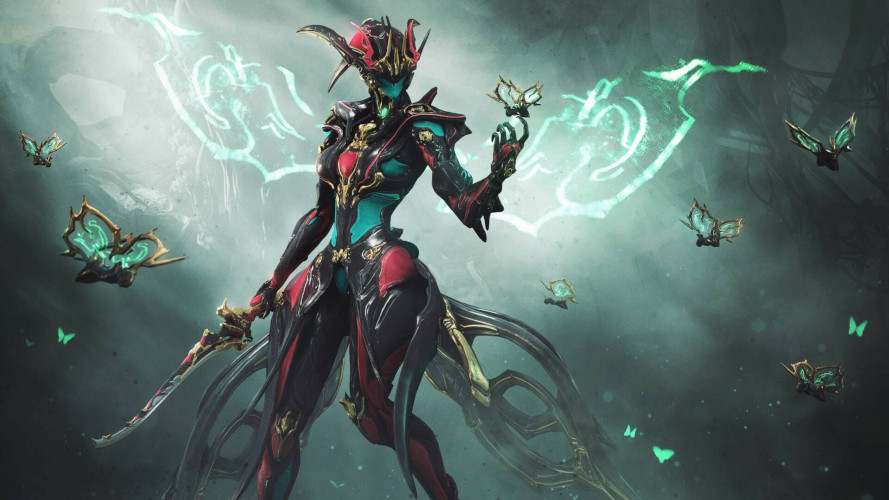
4. Octavia (Best for Control)
 This is Octavia, the melodic, the maestro.
Octavia is a bard, using the power of music to confound the enemy and support her allies. Her first ability creates a ‘Mallet’ which draws the enemy fire whilst damaging them. The more damage inflicted on the mallet, the greater its damage output. This is very effective at blocking off areas as enemies halt their progress to focus on the mallet. Their second ability, ‘Resonator’, creates a charming ball which makes enemies chase after it, and can be combined with ‘Mallet’ to create roaming destructive distraction.
In terms of support, her passive gives some small energy regeneration to herself and her team, which for such an ability focused frame is a nice bonus. ‘Metronome’ gives a passive armor bonus, and buffs Octavia and her team if they perform actions to its rhythm. Timed jumps provide a speed boost, crouches give stealth, firing your guns gives multishot, and melee swings get a damage buff. Everyone can effectively choose which buff they want. Octavia’s fourth ability ‘Amp’ utilises all the noise created by her abilities and everyone’s weaponry and turns it into a damage buff, whilst also doubling the range and damage of her mallets.
It’s important to note that although she does come with a default song, using the Mandachord in her arsenal screen allows you to create your own short song loop. This isn’t just a creative outlet – you can adjust the volume and rhythm, affecting her abilities. Of course, if it all gets too much, you can select the option under audio to adjust your own or other’s Mandachord’s volume, and rely on visual cues instead.
What Octavia Excels In:
- Distracting enemies
- Buffing her team
- Creating dance parties
How to Get Octavia: Octavia’s Blueprint and the Mandachord are acquired from the Octavia’s Anthem quest, and subsequently bought from Cephalon Simaris for 50,000 and 25,000 standing respectively. Her Neuroptics are acquired from Rotation C of Terrorem Survival (Deimos). Her Chassis is acquired from the Music Puzzle (Lua). Her Systems are acquired from the A Rotation Cache of Plato Crossfire Exterminate (Lua).
3. Titania (Best for Mobility)
 This is Titania, the pixie, the unseen.
Warframes are exceptionally mobile, able to slide, jump and glide their way through the game’s terrain. However, Titania is unique in being able to use an archwing in any mission. Her fourth ability, ‘Razorwing’, has her shrink down whilst taking flight whilst creating deadly razorflies which attack the enemy. As a much smaller target,Titania is extremely evasive, and her ability to fly allows her to easily deal with otherwise challenging terrain obstacles. It’s also worth stating that Titania can use all of her other abilities whilst in this mode, so there’s no disadvantage to staying in this mode if you have the energy.
In terms of damage, whilst in ‘Razorwing’ mode Titania has access to her exalted arch-guns, the ‘Dex Pixia’, and her arch-melee weapon ‘Diwata’. Using melee is less practical than the guns, due to her diminutive size limiting their range. However, the mods equipped on it are also applied to Titania’s razorflies, making it worth investing in. Her third ability, ‘Lantern’, also summons razorflies, andtransforms an enemy into a beacon that floats into the air, disabling them. They become a lure to others and will explode if the ability is charged. Her first ability ‘Spellbind’ similarly lifts groups of enemies into the air to disable them, but also makes nearby allies status immune. This effect extends to Titania if the ability is held down.
Finally, Titania’s second ability ‘Tribute’ allows Titania to extract buffs from her enemies. Titania taps to cycle through to the option she wishes to select and holds to extract it. Enemies trapped by ‘Spellbind’ make particularly easy targets. Her four choices are ‘Thorn’, which reduces enemy damage, ‘Dust’, which degrades enemy accuracy, ‘Full Moon’, which increases companion and razorfly damage, and ‘Entangle’, which slows enemies. Any survivors are weakened from the ordeal and easily dispatched.
What Titania Excels In:
- Maroo’s Ayatan Sculpture missions – a great source of endo, these weekly obstacle courses are easier to navigate with a small flying Titania than any other frame.
- Corpus Gas City Tiles, especially the Ropolyst fight – Titania’s flight makes this a lot easier to deal with
- Spy missions – It’s easy to avoid detection when you’re small and can fly – just be careful during the hacking segments.
How to Get Titania: Titania’s parts are acquired from The Silver Grove quest. Subsequently they can be bought by Cephalon Simaris for 50,000 standing for the Blueprints and 25,000 standing for the Neuroptics, Chassis and Systems each.
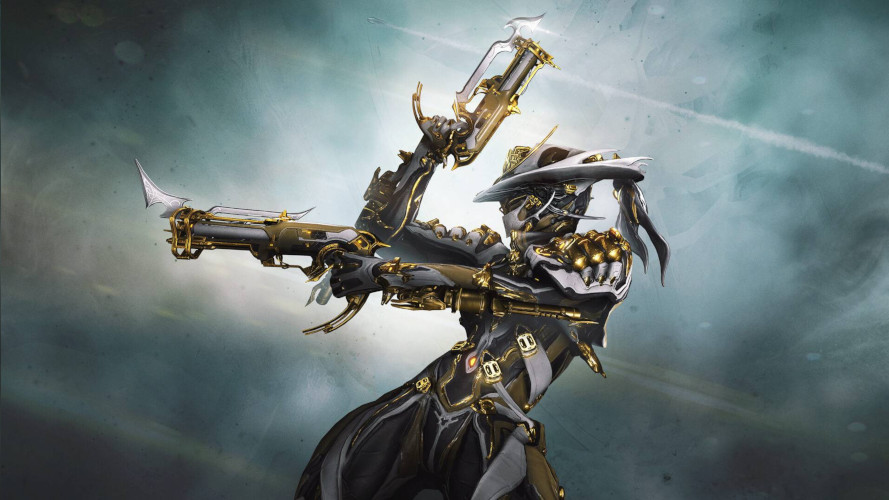
2. Ivara (Best for Stealth)
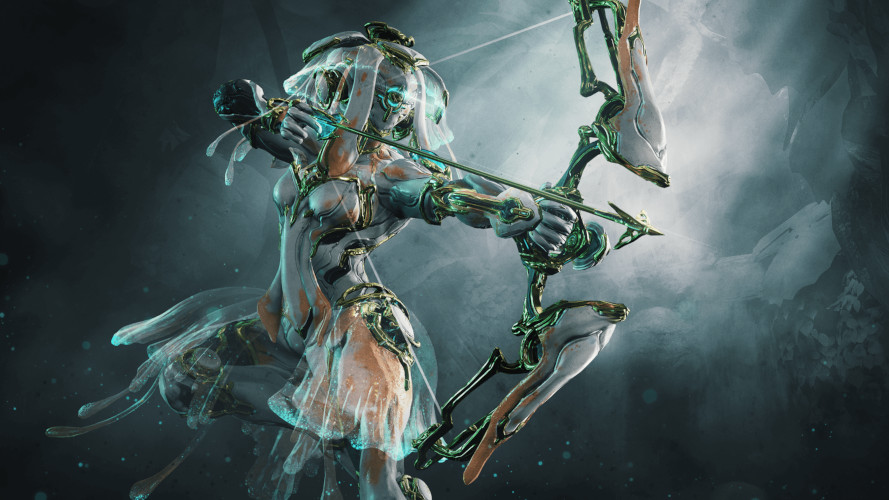 This is Ivara, a deadly duality.
Ivara is a master archer and hunter, using stealth and her exalted bow ‘Artemis‘ to great effect. Summoned by her fourth ability, Ivara can use this bow with unlimited arrows for the duration of its activation. Her second ability ‘Navigator’ takes control of the most recent projectile fired by Ivara, allowing you to control its trajectory for a guaranteed hit. This also allows you to effectively shoot around corners and cover. This is helped by Ivara’s passive, an innate radar which detects nearby enemies, making them visible on the mini-map.
Ivara’s third ability is ‘Prowl’, making her invisible whilst active at the cost of massively reduced speed. This can be somewhat mitigated by rolling and using zip-lines, which are not affected by the reduced speed. This makes Ivara one of the easiest frame to use for stealth, if one of the slowest. This ability truly shines whilst hunting, as it helps avoid detection whilst waiting for your prey for those perfect captures.
Her first ability, ‘Quiver’, allows Ivara to select from four different arrows by tapping and loosing them at a target when held. Alt-fire allows Ivara to use her quiver arrows whilst in ‘Artemis Bow’ mode. ‘Cloak’ creates a small bubble of invisibility for Ivara and any allies, giving her a place to recharge energy between uses of ‘Prowl’. ‘Dashwire’ creates a zip-wire, making it easier for Ivara to get around whilst in ‘Prowl’. ‘Noise’ emits sound at a designated point, drawing enemy attention to either distract them as you pass by or draw them out into firing range.
Her ‘Sleep’ arrow makes a target, well, sleep, taking them out of the fight and opening them up to deadly finishers. This is also a great alternative to the tranq-gun when hunting, as Ivara still has access to the rest of her ‘Prowl’ and ‘Navigator’ skills.
What Ivara Excels In:
- Stealth – Whilst not particularly fast, Ivara can very effectively remain unseen
- Hunting – Ivara’s stealth, sleep arrows and ‘Navigator’ skills almost guarantees a perfect capture
- Using finishers and stealth to level items in an alternative way – finisher kills provide more XP
How to Get Ivara: Ivara’s Components are all acquired from Rotation C of Spy missions, with different difficulties dropping different parts. The Blueprint can be acquired from Uranus, Neptune, Pluto, Sedna and the Sabmir Cloud (Veil Proxima) Empyrean mission. The Neuroptics are acquired from Uranus, Neptune, Pluto, Sedna and the Peregrine Axis (Pluto Proxima) Empyrean mission. The Chassis is acquired from Ceres, Jupiter, Europa, Saturn, Lua, or the Brom Cluster (Neptune Proxima) Empyrean mission. The Systems are acquired from Earth, Venus, Mercury, Mars, Phobos, and the Orvin-Haarc (Venus Proxima) Empyrean mission.
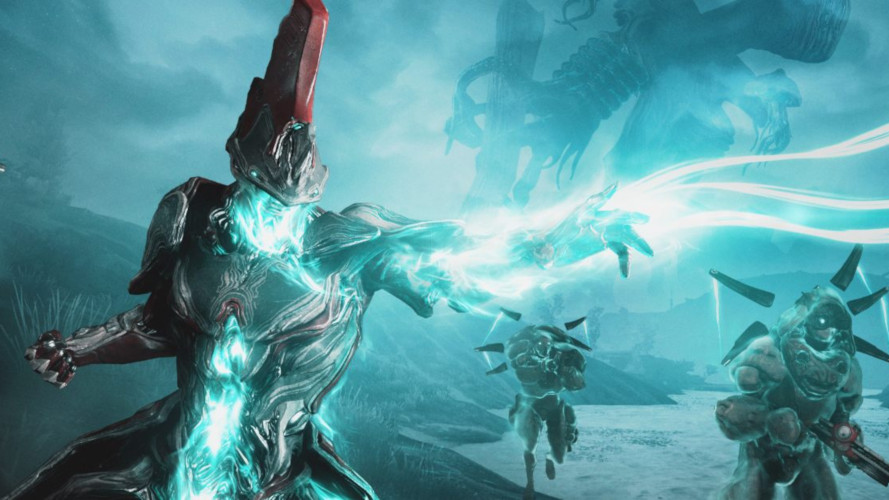
1. Wisp (Best All-Rounder)
 This is Wisp. Summoner of the ethereal.
Wisp is a great frame with a diverse and fun kit. Her first ability summons ‘Reservoirs’ which act as stations for her summoned motes to be picked up by herself and her allies. As with Titania and Ivara earlier in this list, Wisp taps to select whichever mote she desires and holds to place the reservoir. ‘Haste Motes’ boost speed, ‘Vitality Motes’ boost health and provide healing, and ‘Stun Motes’ stun enemies. Six reservoirs can be placed down at once and players can have one of each mote, allowing Wisp to set up multiple resupply points for convenience.
Wisp is also a mobile and evasive frame. Her second ability, ‘Wil-o-Wisp’, sends out a spectral image of Wisp which confuses and distracts enemies. Reactivating the ability makes Wisp teleport to its location. Holding the ability makes it move faster, with Wisp teleporting to it on release. The ability can be used to control enemy movement or to move around more quickly. Adding to her evasiveness is her passive, which makes her invisible whilst airborne.
In terms of damage, Wisp’s third ability ‘Breach Surge’ opens a rift which overwhelms enemies. If damaged, these enemies release Surge sparks, which damage others. Targeting a reservoir with this ability causes Wisp to teleport to it and doubles the range of the surge. This ability can also be comboed with ‘Wil-o-Wisp’ to trigger a surge at the spectre’s location.
Finally, her ‘Sol Gate’ ability has her open a portal to the sun to unleash a destructive beam of fire and radiation damage, two of the most potent in the game. What's more, the longer an enemy is in the beam, the more vulnerable they become. Combining this is ‘Wil-o-Wisp’ and the control abilities of other frames is particularly devastating. Holding the ability also doubles the damage for greater energy costs. Who doesn’t want the power of the sun in the palm of their hand?
What Wisp Excels In:
- Supporting her team through buffs
- Doing damage
- Evading damage
How to Get Wisp: Wisp’s Blueprint, Neuroptics, Chassis and Systems are all acquired from the Ropalyst Assassination (Jupiter).
You May Also Be Interested In:
- Warframe: Best Warframes, Ranked Weakest To Strongest (Warframe Tier List)
- Top 10 Warframe Best Primary Weapons (And How to Get Them)
- [Top 5] Warframe Best Arch-guns And How To Get Them
- [Top 5] Warframe Best Melee Weapons And How To Get Them
- [Top 5] Warframe Best Kuva Weapons And How To Get Them
- [Top 11] Warframe Best Weapons And How To Get Them
Share this Article:

- Log in or register to post comments


![[Top 3] Warframe Excavation Mission Tiers (Latest Patch Echoes Of The Zariman)-1](https://www.gamersdecide.com/sites/default/files/styles/308x185-scale-crop--more-top-stories/public/top_3_warframe_excavation_mission_tiers_latest_patch_echoes_of_the_zariman-1.png "Warframe Excavation Tiers Main Photo")


![[Top 10] Warframe Best Index Weapons Ranked (And How To Get Them)-01](https://www.gamersdecide.com/sites/default/files/styles/308x185-scale-crop--more-top-stories/public/top_10_warframe_best_index_weapons_ranked_and_how_to_get_them-01.jpg "Warframe Index Weapons Main Photo")


![[Top 10] Warframe Best Heavy Blades That Are Powerful (Latest Patch Angels of Zariman) And How To Get Them - 1](https://www.gamersdecide.com/sites/default/files/styles/308x185-scale-crop--more-top-stories/public/top_10_warframe_best_heavy_blades_that_are_powerful_latest_patch_angels_of_zariman_and_how_to_get_them_-_1.jpg "The bigger your weapon, the harder you’ll make your enemies fall.")


![[Top 15] Warframe Best Infested Weapons That Are Powerful (Latest Patch Echoes Of The Zariman)-01](https://www.gamersdecide.com/sites/default/files/styles/308x185-scale-crop--more-top-stories/public/top_15_warframe_best_infested_weapons_that_are_powerful_latest_patch_echoes_of_the_zariman-01.jpg "Warframe Infested Weapons Main Photo")

![[Top 10] Warframe Best Dual Swords Ranked (And How To Get Them)-01](https://www.gamersdecide.com/sites/default/files/styles/308x185-scale-crop--more-top-stories/public/top_10_warframe_best_dual_swords_ranked_and_how_to_get_them-01.jpg "Warframe Dual Swords Main Photo")


![[Top 10] Warframe Best Railjack Weapons That Are Powerful (Latest Patch Angels of Zariman) And How To Get Them - 01](https://www.gamersdecide.com/sites/default/files/styles/308x185-scale-crop--more-top-stories/public/top_10_warframe_best_railjack_weapons_that_are_powerful_latest_patch_angels_of_zariman_and_how_to_get_them_-_01.jpg "One small step for Tenno, one giant bullet jump for Tennokind.")


![[Top 11] Warframe Best Sniper Rifles Ranked (And How To Get Them)-01](https://www.gamersdecide.com/sites/default/files/styles/308x185-scale-crop--more-top-stories/public/top_11_warframe_best_sniper_rifles_ranked_and_how_to_get_them-01.jpg "Warframe Sniper Rifles Main Photo")


![[Top 10] Warframe Best Glaive Weapons That Are Powerful (Latest Patch Echoes Of The Zariman) And How To Get Them-01](https://www.gamersdecide.com/sites/default/files/styles/308x185-scale-crop--more-top-stories/public/top_10_warframe_best_glaive_weapons_that_are_powerful_latest_patch_echoes_of_the_zariman_and_how_to_get_them-01.jpg "Glaives Main Photo")


![[Top 10] Warframe Best Melee Stances That Are Powerful-01](https://www.gamersdecide.com/sites/default/files/styles/308x185-scale-crop--more-top-stories/public/top_10_warframe_best_melee_stances_that_are_powerful-01.jpg "Warframe Melee Stances Main Photo")


![[Top 10] Warframe Best Bosses To Kill For Rewards-01](https://www.gamersdecide.com/sites/default/files/styles/308x185-scale-crop--more-top-stories/public/top_10_warframe_best_bosses_to_kill_for_rewards-01.jpg "Warframe Bosses Main Photo")


