You’ve dealt with the champions and legendary bounties of open-world PvE and found them to not be challenging enough for you, so you finally decided to take the leap and get into the endgame content: Instanced PvE content. Raids and strike missions are the most difficult content in Guild Wars 2 and can destroy even the most organized groups if critical mistakes are made along the way. If you need help finding a good build for your next raid or strike mission in-game, this article has you covered.
A quick explanation for Raids and Strike Missions
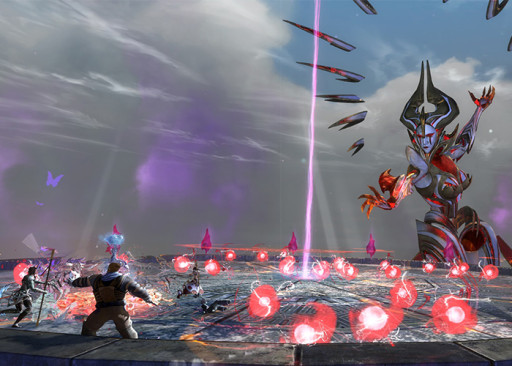
Strike missions are essentially easier raids designed to introduce a more casual audience to more difficult content while also teaching players the various mechanics. Despite being easier, they can quickly dispatch players who think it will be a breeze and play recklessly. Strike missions, unlike dungeons, necessitate planning and coordination.
10. Power DPS Deadeye - Kiter
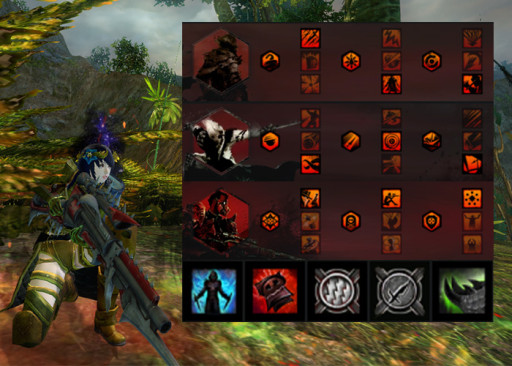
Why Power DPS Deadeye is great for Raids and Strike Missions
- The Kiter variant, which we will look at in this article, is an excellent source of long-ranged damage that can easily bob and weave around encounters.
- When the situation arises for it, you can share your Basilisk Venom with your allies and deal massive damage to the enemy's Defiance bar. You can also use your sword/pistol to deal extra damage with the Pistol Whip and Headshot weapon skills.
- For more up-close and personal encounters, you can easily switch to the DPS Variant of the build by swapping your rifle for dual daggers and switching your perks and skills around.
Choose this build if:
- You must be able to freely switch your build around depending on your needs. If the team requires you to kite, stay on your build; if they require more DPS, switch.
- You are a capable Deadeye main able to remain alive while kiting for their life.
- You want to stick with the Kiting build if you prefer a simpler skill rotation. It deals a respectable amount of damage that matters to your team.
Full build details:
Traits and Major Perks:
- Deadly Arts - Dagger Training or Mug, Revealed Training, Executioner
- Critical Strikes - Twin Fangs, Practiced Tolerance, Invigorating Precision
- Deadeye - Malicious Intent, Silent Scope, Maleficent Seven
Equipment
- Armor - Full set of Berserker stat armor (power + ferocity + precision)
- Superior Runes of the Scholar (increases power, ferocity, and strike damage when health is above 90%)
- Trinkets - Full set of Berserker stat trinkets
- Weapon set 1 - Berserker stat two-handed rifle with Superior Sigils of Force (increases outgoing damage) and Impact (increases overall strike damage and damage dealt to enemies that are stunned or knocked down)
- Weapon set 2 - Berserker stat main-hand sword and off-hand pistol with Superior Sigils of Celerity (upon successfully disabling a foe, gain Quickness buffs for a few seconds) and Paralyzation (increases outgoing Stun debuff duration)
Consumables
- Food - Bowl of Sweet and Spicy Butternut Squash Soup (increases power, ferocity, and experience gained from killing foes)
- Utility - Superior Sharpening Stone (increases power based on a percentage of both precision and ferocity, and increases experience gained from killing foes)
Infusions
- 18 pieces of +9 Agony Infusions (increases agony resistance)
- *optional variant* - 18 pieces of Mighty +9 Agony Infusion (increases power and agony resistance)
Utility Skills
- Heal Skill - Hide in Shadows - A core Thief Deception healing skill that grants the user a Stealth buff and cleanses conditions. It then grants Regeneration buffs and heals the user.
- Utility Skill 1 - Mercy - A Deadeye Cantrip skill that makes the user lose their Malice stacks and gain initiative while refreshing their Deadeye’s Mark. The skill also functions as a stun break.
- Utility Skill 2 - Signet of Agility - A core Thief Signet skill that passively increases the user’s precision. When activated, it refills the user’s Endurance bar and cleanses conditions from itself and surrounding allies.
- Utility Skill 3 - Assassin’s Signet - A core Thief Signet skill that passively increases the user’s power. When activated, the user’s power is increased even further.
- Elite Skill - Basilisk Venom - A core Thief elite Venom skill that makes the user’s and surrounding allies’ attacks unblockable and turns enemies to stone, inflicting damage to the enemies’ break bars.
For more information on the build, click on this link: GuildJen.com
9. Beginner Power Weaver - DPS
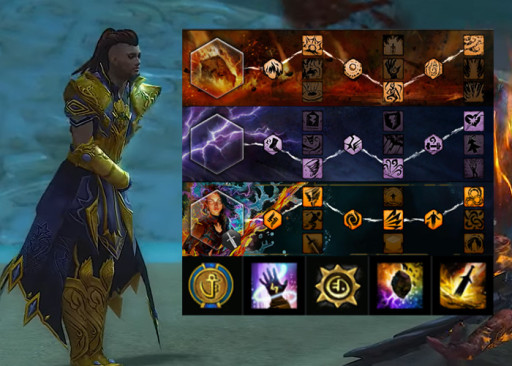
Why Beginner Power Weaver is great for Raids and Strike Missions
- As previously stated, the Beginner Power Weaver has the ability to deal a surprising amount of burst damage.
- The difficulty of learning the skill rotation for any Weaver build is astounding, but it only demonstrates your mastery of the profession. This build assists Weavers in gaining confidence in becoming better Elementalist mains who can be valuable assets to raid and strike mission teams.
- By switching some traits and skills around, the Beginner Power Weaver build can evolve into the proper Power Weaver build with a little tweaking and experience.
Choose this build if:
- You are a Weaver looking to find a good beginner build that can help you become a DPS unit for instanced PvE content.
- You are looking for a build you can use for training and eventually swap out for stronger or recommended ones when your experience and confidence are high enough.
- You are an experienced Elementalist-main who is looking for a simpler skill rotation, unlike other builds.
Full build details:
Traits and Major Perks:
- Fire - Burning Precision, Power Overwhelming, Persisting Flames
- Air - Ferocious Winds, Stormsoul, Bolt to the Heart
- Weaver - Superior Elements, Swift Revenge, Elements of Rage
Equipment
- Armor - Full set of Berserker stat armor (power + ferocity + precision)
- Superior Runes of the Scholar (increases power, ferocity, and strike damage when health is above 90%)
- Trinkets - Full set of Berserker stat trinkets
- Weapon set 1 - Berserker stat main-hand sword and off-hand dagger with Superior Sigils of Force (increases outgoing damage) and Impact (increases overall strike damage and damage dealt to enemies that are stunned or knocked down)
- Weapon set 2 - Not applicable
Consumables
- Food - Bowl of Sweet and Spicy Butternut Squash Soup (increases power, ferocity, and experience gained from killing foes)
- Utility - Potent Superior Sharpening Stone (increases power based on a percentage of both precision and ferocity, and increases experience gained from killing foes)
Infusions
- 14 pieces of Mighty +5 Agony Infusions (increases power and agony resistance)
- 4 pieces of Precise +5 Agone Infusions (increases precision and agony resistance)
Utility Skills
- Heal Skill - Signet of Restoration - A core Elementalist healing Signet skill that passively heals your whenever you cast a spell. When activated, it heals you.
- Utility Skill 1 - Unravel - A Weaver Stance skill that makes the user fully attuned to your primary element, gains buffs depending on which element you attuned to, and reduces the attunement cooldown.
- Utility Skill 2 - Glyph of Storms - A core Elementalist Glyph skill that casts an area-of-effect at a targeted area with a damaging storm based on your current attuned element.
- Utility Skill 3 - Primordial Stance - A Weaver Stance skill that deals damage and conditions based on your current attunement. If you are currently fully attuned to a single element instead of two different ones, the condition inflicted is dealt twice.
- Elite Skill - Conjure Fiery Greatsword - A core Elementalist elite Conjure skill that summons an equipable fiery greatsword at a targeted area that damages foes it lands on. Upon equipping the sword, users gain an increase in stats and change their current weapon skills temporarily.
For more information on the build, click on this link: Snowcrows.com
8. Heal Alacrity Druid - Support

Why Heal Alacrity Druid is great for Raids and Strike Missions
- The Heal Alacrity Druid isn't just about healing; it also provides useful buffs like Alacrity, which reduces skill cooldowns.
- Although the Heal Alacrity Druid is a medic, it is still a Ranger. When they aren't healing and supporting their allies, they are blasting crowd control skills.
- They can easily apply their buffs by using their Spirit Skills, but they must position them properly because the spirits can be defeated in battle if they are targeted.
Choose this build if:
- You want to provide heals passively through the use of Spirits.
- You don’t mind being pure support for the majority of the raid and/or strike missions.
- You don’t mind not being the top DPS of the team and would rather keep the team alive thanks to your contributions.
Full build details:
Traits and Major Perks:
- Skirmishing - Sharpened Edges, Spotter, Quick Draw
- Nature Magic - Instinctive Reaction, Windborne Notes, Nature’s Vengeance
- Druid - Primal Echoes, Celestial Shadow, Grace of the Land
Equipment
- Armor - Full set of Harrier stat armor (power + healing + concentration)
- Superior Runes of the Monk (increases healing, boon duration, and healing effectiveness)
- Trinkets - Full set of Harrier stat trinkets
- Weapon set 1 - Harrier stat main-hand axe and off-hand warhorn with Superior Sigils of Transference (increases outgoing healing) and Concentration (increases boon duration)
- Weapon set 2 - Harrier stat two-handed staff with Superior Sigils of Transference and Concentration
Consumables
- Food - Bowl of Fruit Salad with Mint Garnish (increases outgoing healing, healing power, concentration, Karma gained, Magic and Gold find, and experience gained)
- Utility - Bountiful Maintenance Oil (increases outgoing healing based on your healing power and concentration, and experience gained from killing foes)
Infusions
- 18 pieces of Healing WvW Infusions (increases healing and damage done to enemy Guards, Lords, and Supervisors in World vs World)
Utility Skills
- Heal Skill - Water Spirit - A core Ranger healing Spirit skill that summons a spirit that generates Regeneration boons for you and allies while also healing you within a radius of it.
- Utility Skill 1 - Frost Spirit - A core Ranger Spirit skill that summons a spirit that generates Might boons for you and your allies within a radius of it.
- Utility Skill 2 - Sun Spirit - A core Ranger Spirit skill summons a spirit that grants Vigor boons for you and your allies within a radius of it.
- Utility Skill 3 - Stone Spirit - A core Ranger Spirit skill that summons a spirit that generates Protection boons for you and your allies within a radius of it.
- Elite Skill - Spirit of Nature - A core Ranger Spirit elite skill that summons a spirit that heals and can revive allies from a downed state within a radius of it.
For more information on the build, click on this link: Hardstuck.gg
7. Alacrity Support Power DPS Mechanist - Support / DPS
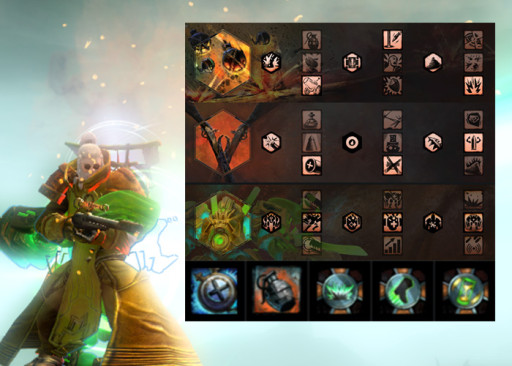
Why Alacrity Support Power DPS Mechanist is great for Raids and Strike Missions
- With its mace and shield, the Mechanist goes face-to-face with its adversaries and can dish out loads of crowd control if needed.
- The build, as the name suggests, demonstrates how it can provide nearly permanent Alacrity buffs for itself and the team, allowing your squad’s skills to cool down faster and be more prepared with your CC skills.
- The Mechanist can use a simple skill rotation to deal massive damage with this build.
Choose this build if:
- You want a strong Mechanist build that will fit in with most squads.
- You want to be a well-rounded DPS who can also provide a lot of Alacrity.
- You can easily control your Mech when needed so it doesn’t make the raid harder thanks to NPC A.I.
Full build details:
Traits and Major Perks:
- Explosives - Glass Cannon, Aim-Assisted Rocket, Big Boomer
- Firearms - High Caliber, No Scope, Modified Ammunition
- Mechanist - Mech Arms: High-Impact Drivers, Mech Frame: Channeling Conduits, Mech Core: Barrier Engine
Equipment
- Armor - Three pieces of Diviner stat armor (power + concentration + precision + ferocity), two pieces of Assassin’s stat armor (precision + power + ferocity) and one piece of Berserker stat armor (power + ferocity + precision)
- Superior Runes of the Scholar (increases power, ferocity, and strike damage when health is above 90%)
- Trinkets - Five pieces of Berserker stat trinkets and one piece of Diviner stat trinkets (preferably the backpiece)
- Weapon set 1 - Berserker stat two-handed rifle with Superior Sigils of Concentration (increases boon duration) and Superior Sigils of Force (increases outgoing damage)
- Weapon set 2 - Not applicable
Consumables
- Food - Bowl of Sweet and Spicy Butternut Squash Soup (increases power, ferocity, and experience gained from killing foes)
- Utility - Superior Sharpening Stone (increases power based on a percentage of both precision and ferocity, and increases experience gained from killing foes)
Infusions
- 18 pieces of +9 Agony Infusions (increases agony resistance)
Utility Skills
- Heal Skill - A.E.D. - A core Engineer healing Gadget skill that heals you after a brief period. You gain tons of health if you take lethal damage during that time while also being granted a Shock Aura, while also cleansing conditions off of you. If you don’t take lethal damage, heal normally when the duration expires.
- Utility Skill 1 - Grenade Kit - A core Engineer Engineering Kit skill that switches their weapon slots for grenades.
- Utility Skill 2 - Force Signet - A Mechanist Signet skill that passively increases your strike damage. When activated, you knock your foes away from you and your mech.
- Utility Skill 3 - Shift Signet - A Mechanist Signet skill that passively increases your movement speed. When activated, you and your mech teleport to the targeted area and break out of stun.
- Elite Skill - Overclock Signet - A Mechanist elite Signet skill that passively recharges the cooldown of your signets. When activated, your Mech launches a powerful laser when present and when it isn’t, it summons your mech even when Crash Down is on cooldown.
For more information on the build, click on this link: Metabattle.com
6. Condition Renegade - DPS
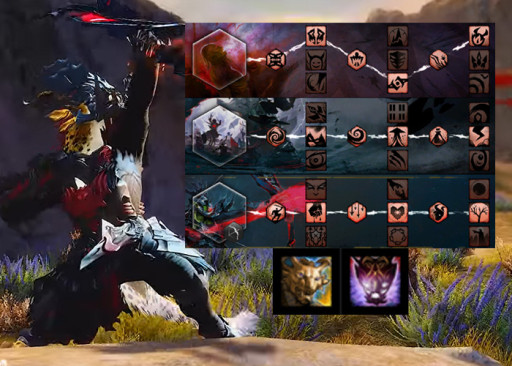
Why Condition Renegade is great for Raids and Strike Missions
- The Condition Renegade can power through the raid and strike mission encounters that require condition damage from players.
- When necessary, the build can provide additional Might buffs to the team, which is built into its core mechanics.
- The build proves the user is a seasoned Renegade-main because of how it needs to juggle its energy mechanics and switch in time to trigger the Charged Mists perk.
Choose this build if:
- Your team needs a strong condition damage-based profession for fights that need it.
- Your team requires additional access to healing and your Renegade-exclusive heal can help your squad.
- Your team lacks sources of Might buffs and you can provide it easily.
Full build details:
Traits and Major Perks:
- Corruption - Acolyte of Torment, Pact of Pain, Diabolic Inferno
- Invocation - Rising Tide, Spirit Boon, Charged Mists
- Renegade - Blood Fury, Hearpiercer, Lasting Legacy
Equipment
- Armor - Full set of Viper’s stat armor (power + condition damage + precision + expertise)
- Superior Runes of the Nightmare (increases condition damage, fear duration, outgoing condition duration, then blinds and transfers a condition to nearby enemies when you use an elite skill)
- Trinkets - Full set of Viper’s stat trinkets
- Weapon set 1 - Viper’s stat main-hand mace and off-hand axe with Superior Sigils of Doom (after switching weapons, your next attack inflicts Poison debuffs) and Earth (when you land a critical hit, inflict Bleeding debuffs)
- Weapon set 2 - Viper’s stat two-handed short bowl with Superior Sigils of Geomancy (after switching weapons, you inflict Bleeding debuffs on surrounding enemies) and Torment (when you land a critical hit, inflict Torment debuffs)
Consumables
- Food - Cilantro and Cured Meat Flatbread (grants a chance to steal health upon a hit, increases condition damage and expertise stats, increases Karma, Gold, and Magic Find, and sources of experience)
- Utility - Toxic Focusing Crystal (increases condition damage based on both your precision and expertise, then increases your experience gained after killing a foe)
Infusions
- 18 pieces of Malign +5 Agony Infusions (increases condition damage and agony resistance for Fractals of the Mists)
Utility Skills (Legends invoked)
- Revenants and their elite specializations’ utility skills are tied to the legends they invoke in battle and cannot be switched around, so we will instead list the legends and their abilities.
- Legendary Renegade Stance - Channel the Legendary Charr Renegade, Kalla Scorchrazor, and her warband in battle. Each member summoned does unique area-of-effects from healing to inflicting pure damage and debuffs.
- Legendary Demon Stance - Channel the Legendary Demon, Mallyx the Unyielding. Using his stance gives you access to many debilitating skills to use against your foes and the elite skill, Embrace the Darkness, transforms you into a powerful avatar that pulses Torment debuffs.
For more information on the build, click on this link: Snowcrows.com
5. Staff Alacrity DPS Mirage - Tank DPS / Kiter
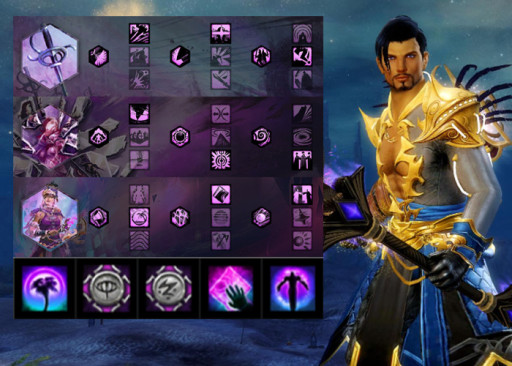
Why Staff Alacrity DPS Mirage is great for Raids and Strike Missions
- The Staff Alacrity DPS Mirage can provide excellent offense on one side while also supporting the team with Alacrity buffs on the other.
- The build is surprisingly tanky due to its highly elusive abilities and frequent use of Distortion to easily avoid almost all fatal hits (except of course certain abilities that will guarantee 1-hit KO squads for failing mechanics).
- The kiter variant is simple to use by swapping the second staff for a main-hand sword and off-hand focus, then swapping some perks around.
Choose this build if:
- Your team needs a Mirage that is well-rounded and flexible enough to do DPS and kiting.
- Your team lacks sources of Alacrity and you can provide it as a Mirage.
- You don’t have to worry about dodging off of platforms because of the core mechanic of Mirages changing their dodges into Mirage Cloaks.
Full build details:
Traits and Major Perks:
- Dueling - Phantasmal Fury, Blinding Dissipation, Ineptitude
- Chaos - Method of Madness, Chaotic Potency, Bountiful Disillusionment
- Mirage - Renewing Oasis, Desert Distortion, Infinite Horizon
Equipment
- Armor - Full set of Viper’s stat armor (power + condition damage + precision + expertise)
- Superior Runes of the Nightmare (increases condition damage, fear duration, outgoing condition duration, then blinds and transfers a condition to nearby enemies when you use an elite skill)
- Trinkets - Full set of Viper’s stat trinkets
- Weapon set 1 - Viper’s stat two-handed staff with Superior Sigils of Bursting (increases condition damage) and Energy (upon switching weapons, gain some Endurance)
- Weapon set 2 - Another Viper’s stat two-handed staff with Superior Sigils of Bursting and Energy
Consumables
- Food - Red-Lentil Saobosa (increases expertise, condition damage, and experience gained from killing foes)
- Utility - Toxic Maintenance Oil (increases concentration based on both your power and condition damage, then increases experience gained from killing foes)
Infusions
- 18 pieces of +9 Agony Infusions (increases agony resistance)
- *optional variant* - 18 pieces of Mystical +9 Agony Infusion (increases concentration and agony resistance)
Utility Skills
- Heal Skill - False Oasis - A Mirage healing Deception skill that creates a mirage at your current position which heals you. When it ends, it creates a Mirage Mirror for you to use and gain the ability to use your Ambush skills.
- Utility Skill 1 - Signet of Midnight - A core Mesmer Signet skill that passively increases the user’s expertise. When activated, it acts as a stun break while blinding surrounding foes and grants the user a Stealth buff.
- Utility Skill 2 - Signet of Domination - A core Mesmer Signet skill that passively increases the user’s condition damage. When activated, it stuns your targeted foe.
- Utility Skill 3 - Crystal Sands - A Mirage Deception skill that launches crystal shards at a targeted location. The shards then form a Mirage Mirror at their destination for the user to use.
- Elite Skill - Jaunt - A Mirage elite Deception skill that teleports the user to a targeted area and inflicts Confusion debuffs and damage. It also acts as a Leap combo finisher.
For more information on the build and the kiter variant, click on this link: GuildJen.com
4. Heal Scourge - Support

Why Heal Scourge is great for Raids and Strike Missions
- Despite not being a healer in the traditional sense, it can prevent unnecessary team wipeouts by mitigating damage with its abundance of shields and ability to quickly revive downed players.
- The build is surprisingly simple to use and is suitable for raid and strike mission beginners.
- When in dire straits, the Heal Scourge can teleport downed players to its location, which is an important aspect of their build.
Choose this build if:
- You want to play as a tanky medic that can rescue their teammates when things go south.
- You aren’t afraid to be in the midst of battle and cast multiple shields when the team needs them the most.
- You wish to save lives through the use of death magic.
Full build details:
Traits and Major Perks:
- Blood Magic - Ritual of Life, Banshee’s Wail OR Vampiric Presence, Transfusion
- Soul Reaping - Unyielding Blast, optional second slot, Eternal Life
- Scourge - Abrasive Grit, Herald of Sorrow, Sand Savant
Equipment
- Armor - Full set of Magi stat armor (healing + precision + vitality)
- Superior Runes of Mercy (increases toughness, healing power, decreases incoming damage when healing downed allies, revives allies much faster, and gives more health)
- Trinkets - Full set of Magi stat trinkets
- Weapon set 1 - Magi stat main-hand dagger and off-hand warhorn with Superior Sigils of Water (when you land a critical hit, heal allies around you) and Transference (increases outgoing healing) main-hand sword and off-hand pistol
- Weapon set 2 - Magi stat main-hand scepter and off-hand torch with Superior Sigils of Water and Transference
Consumables
- Food - Delicious Rice Ball (increases healing power and outgoing healing, then increases experience gained from killing foes)
- Utility - Master Tuning Crystal (increases condition damage based on the percentage of both your precision and expertise, then increases experience gained from killing foes)
Infusions
- 18 pieces of +9 Agony Infusions (increases agony resistance)
- *optional variant* - 18 pieces of Vital +9 Agony Infusion (increases vitality and agony resistance)
Utility Skills
- Heal Skill - Well of Blood - A core Necromancer healing Well skill that drops an area-of-effect at a target location that pulses healing.
- Utility Skill 1 - Signet of Undeath - A core Necromancer Signet skill that passively generates life force for its user while in combat. When activated, the user sacrifices some health to revive a targeted downed ally.
- Utility Skill 2 - Spectral Grasp - A core Necromancer Spectral skill that pulls your enemies toward you and inflicts Chill debuff while stealing life force.
- Utility Skill 3 - Trail of Anguish - A Scourge Punishment skill that leaves a trail of sand wherever you go temporarily. It grants boons for allies, debuffs for enemies that walk through it, and acts as a stun break.
- Elite Skill - Summon Flesh Golem - A core Necromancer elite Minion skill that summons a Flesh Golem to aid you in battle. When activated, the Flesh Golem charges at your enemies, causing damage to the enemy’s Defiance bar.
For more information on the build, click on this link: GuildJen.com
3. Power Quickness Bladesworn - DPS
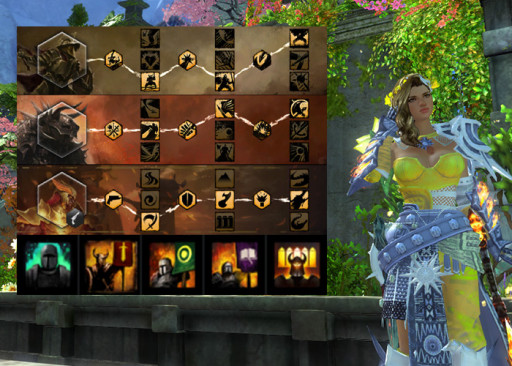
Why Power Quickness Bladesworn is great for Raids and Strike Missions
- The Power Quickness Bladesworn is a deadly unit that is always ready to deal massive damage thanks to its innate raw power.
- Unlike other Warrior builds, it does not rely on shouts to support allies, but rather on banners, which are more reliable sources of buffs.
- Quickness buff uptime is nearly permanent due to their ability to summon banners quickly.
Choose this build if:
- Your team requires a dependable unit that can serve as both boon support and DPS.
- You are a team player who can share your banners with your teammates.
- You can place the banners in just the right places for the team to benefit from the boons they provide.
Full build details:
Traits and Major Perks:
- Strength - Peak Performance, Great Fortitude, Berserker’s Power
- Discipline - Warrior’s Sprint, Battle Standards, Axe Mastery
- Bladesworn - Unseen Sword, Fierce as Fire, Unyielding Dragon
Equipment
- Armor - Full set of Berserker stat armor (power + ferocity + precision)
- Superior Runes of the Thief (increases precision, condition damage, and strike damage when attacking from the sides or flank of the enemy)
- Trinkets - Full set of Berserker stat trinkets
- Weapon set 1 - Berserker stat two-handed rifle with Superior Sigils of Force (increases outgoing damage) and Accuracy (increases critical hit chance)
- Weapon set 2 - Not applicable since Bladesworn cannot switch primary weapons in combat other than their Gunsword on their F1 skill.
Consumables
- Food - Bowl of Sweet and Spicy Butternut Squash Soup (increases power, ferocity, and experience gained from killing foes)
- Utility - Furious Sharpening Stone (increases power and ferocity based on your precision, and then increases experience gained from killing foes)
Infusions
- 18 pieces of Mighty +5 Agony Infusion (increases power and agony resistance)
Utility Skills
- Heal Skill - “To The Limit!” - A core Warrior healing Shout skill that raises the user’s Adrenaline bar and greatly heals them. It grants some Endurance for nearby allies.
- Utility Skill 1 - Banner of Strength - A core Warrior Banner skill that drops a banner on a targeted area. It dazes enemies, inflicting damage on their Defiance bar, and pulses boons for the user and their allies.
- Utility Skill 2 - Banner of Discipline - A core Warrior Banner skill that drops a banner on a targeted area. It inflicts damage and conditions on foes then pulses boons for the user and their allies.
- Utility Skill 3 - Banner of Tactics - A core Warrior Banner skill that drops a banner on a targeted area. It grants Superspeed, several boons, and acts as a stun break when it first lands. It then pulses additional boons for the user and their allies.
- Elite Skill - Tactical Reload - A Bladesworn elite Armament skill that reloads the ammunition for the Bladesworn skills. The next usage of Dragon Trigger also increases charges by a set interval temporarily.
For more information on the build, click on this link: Snowcrows.com
2. Aegis Heal Firebrand - Support
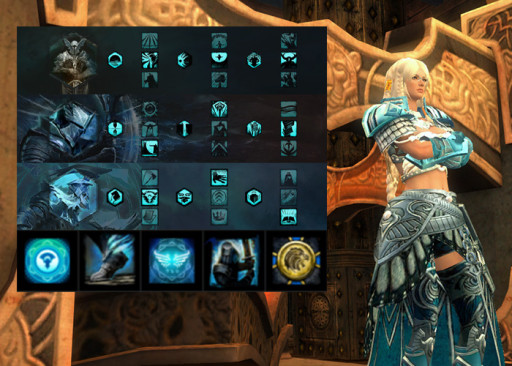
Why Aegis Heal Firebrand is great for Raids and Strike Missions
- It has access to multiple boons that can easily turn the tide for their team.
- Aegis is a much-needed defensive boon that Firebrands can share with their teammates and protect them from potentially fatal blows.
- The Aegis Heal Firebrand is the swiss army knife of supports capable of giving not just boons but also reflects, crowd control, and even condition cleanses.
Choose this build if:
- You don't mind getting close to your squad and granting all the boons you can.
- As an experienced Guardian, you are at ease in the heat of battle and can easily protect your teammates.
- You want to always have a spot on the team because “Healbrands” is known to be a meta build.
Full build details:
Traits and Major Perks:
- Virtues - Resolute Subconsious, Absolute Resolve, Battle Presence
- Honor - Protector’s Restoration, Honorable Staff, Writ of Persistence
- Firebrand - Liberator’s Vow, Weighty Terms, Loremaster
Equipment
- Armor - Full set of Harrier stat armor (power + healing + concentration)
- Superior Runes of the Monk (increases healing, boon duration, and healing effectiveness)
- Trinkets - Full set of Minstrel stat trinkets (toughness + healing + vitality + concentration)
- Weapon set 1 - Harrier stat two-handed staff with Superior Sigils of Concentration (increases boon duration) and Transference (increases outgoing healing)
- Weapon set 2 - Harrier stat main-hand axe and off-hand shield with Superior Sigils of Concentration and Transference
Consumables
- Food - Delicious Rice Ball (increases healing power and outgoing healing, then increases experience gained from killing foes)
- Utility - Bountiful Maintenance Oil (increases outgoing healing based on both your healing power and concentration, then increases your experience gained from killing foes)
Infusions
- 18 pieces of +9 Agony Infusions (increases agony resistance)
- *optional variant* - 18 pieces of Healing +9 Agony Infusion (increases healing power and agony resistance)
Utility Skills
- Heal Skill - Mantra of Solace - A Firebrand healing Mantra skill that grants defensive boons for the user and allies around it while healing them.
- Utility Skill 1 - “Advance!” - A core Guardian Shout skill that grants Aegis and Swiftness buffs for you and your allies.
- Utility Skill 2 - Mantra of Potence - A Firebrand Mantra skill that grants Quickness buffs for you and your allies.
- Utility Skill 3 - “Stand Your Ground!” - A core Guardian Shout skill that grants the user and their allies Stability buffs and acts as a stun break.
- Elite Skill - Signet of Courage - A core Guardian elite Signet skill that passively heals allies around you while in combat. When activated, the user begins to channel healing and boons. If the skill is not interrupted, large amounts of healing are granted.
For more information on the build, click on this link: GuildJen.com
1. Power DPS Virtuoso - DPS
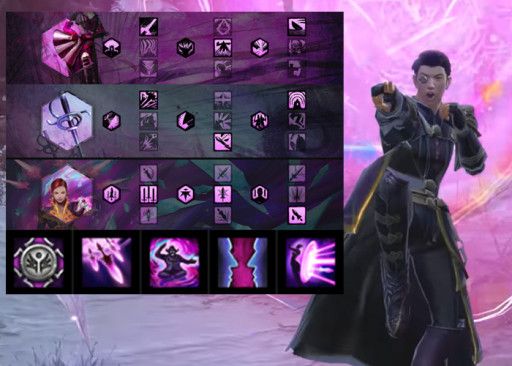
Why Power DPS Virtuoso is great for Raids and Strike Missions
- The Power DPS Virtuoso is a very simple and effective build to use that makes the most of their skills.
- The build can deal a lot of damage from mid to long range and avoid most hazards.
- The Power DPS Virtuoso build has nearly constant Fury buffs and can inflict a large number of Vulnerability debuffs.
Choose this build if:
- You'll need a powerful DPS build to keep the pressure on the various bosses.
- You'll need a long-range build that can switch perks and equipment to get into melee range depending on the needs of the current encounter.
- You are a self-assured Virtuoso-main who can keep Fury buffs active.
Full build details:
Traits and Major Perks:
- Domination - Bountiful Blades., Egotism, Vicious Expression
- Dueling - Phantasmal Fury, Fencer’s Finesse, Superiority Complex
- Virtuoso - Mental Focus, Phantasmal Blades, Bloodsong
Equipment
- Armor - Full set of Berserker stat armor (power + ferocity + precision)
- Superior Runes of the Scholar (increases power, ferocity, and strike damage when health is above 90%)
- Trinkets - Full set of Berserker stat trinkets
- Weapon set 1 - Berserker stat main-hand dagger and off-hand sword with Superior Sigils of Accuracy (increases critical hit chance) and Force (increases outgoing damage)
- Weapon set 2 - Berserker stat two-handed greatsword with Superior Sigils of Accuracy and Force
Consumables
- Food - Bowl of Sweet and Spicy Butternut Squash Soup (increases power, ferocity, and experience gained from killing foes)
- Utility - Superior Sharpening Stone (increases power based on a percentage of both precision and ferocity, and increases experience gained from killing foes)
Infusions
- 14 pieces of Mighty +9 Agony Infusions (increases power and agony resistance)
- 4 pieces of Precist +9 Agony Infusions (increases precision and agony resistance)
Utility Skills
- Heal Skill - Signet of the Ether - A core Mesmer healing Signet skill that passively grants healing every time an illusion, phantasm, or blade is created. When activated, it grants healing and reduces the recharge rate for phantasm skills.
- Utility Skill 1 - Rain of Swords - A Virtuoso Psionic skill that launches a storm of blades at a target and inflicts Vulnerability debuffs.
- Utility Skill 2 - Mantra of Pain - A core Mesmer Mantra skill that inflicts damage on enemies and inflicts additional Vulnerability debuff if an enemy hasn’t used a skill prior to it being used.
- Utility Skill 3 - Phantasmal Disenchanter - A core Mesmer Phantasm skill that summons an illusion that strips boons off of enemies and deals increased damage on foes without boons.
- Elite Skill - Thousand Cuts - A Virtuoso elite Psionic skill that launches piercing, unblockable blades repeatedly along a straight path.
For more information on the build, click on this link: Metabattle.com
Closing Thoughts
Raids and strike missions are tough challenges meant for players who go above and beyond to finish hard battles alongside equally great teammates. Those who wind up going all the way will reap the majority of the rewards and can finally call themselves raiders. With these builds at your side, you can make your encounters more enjoyable, but builds alone can only take you so far. From this point forward, your skill and knowledge of your profession’s mechanics will see you through.
What do you think, dear reader, did we miss any fun, viable, meta builds on our article? Do let us know down in the comments so that we can create an updated list in the future.

