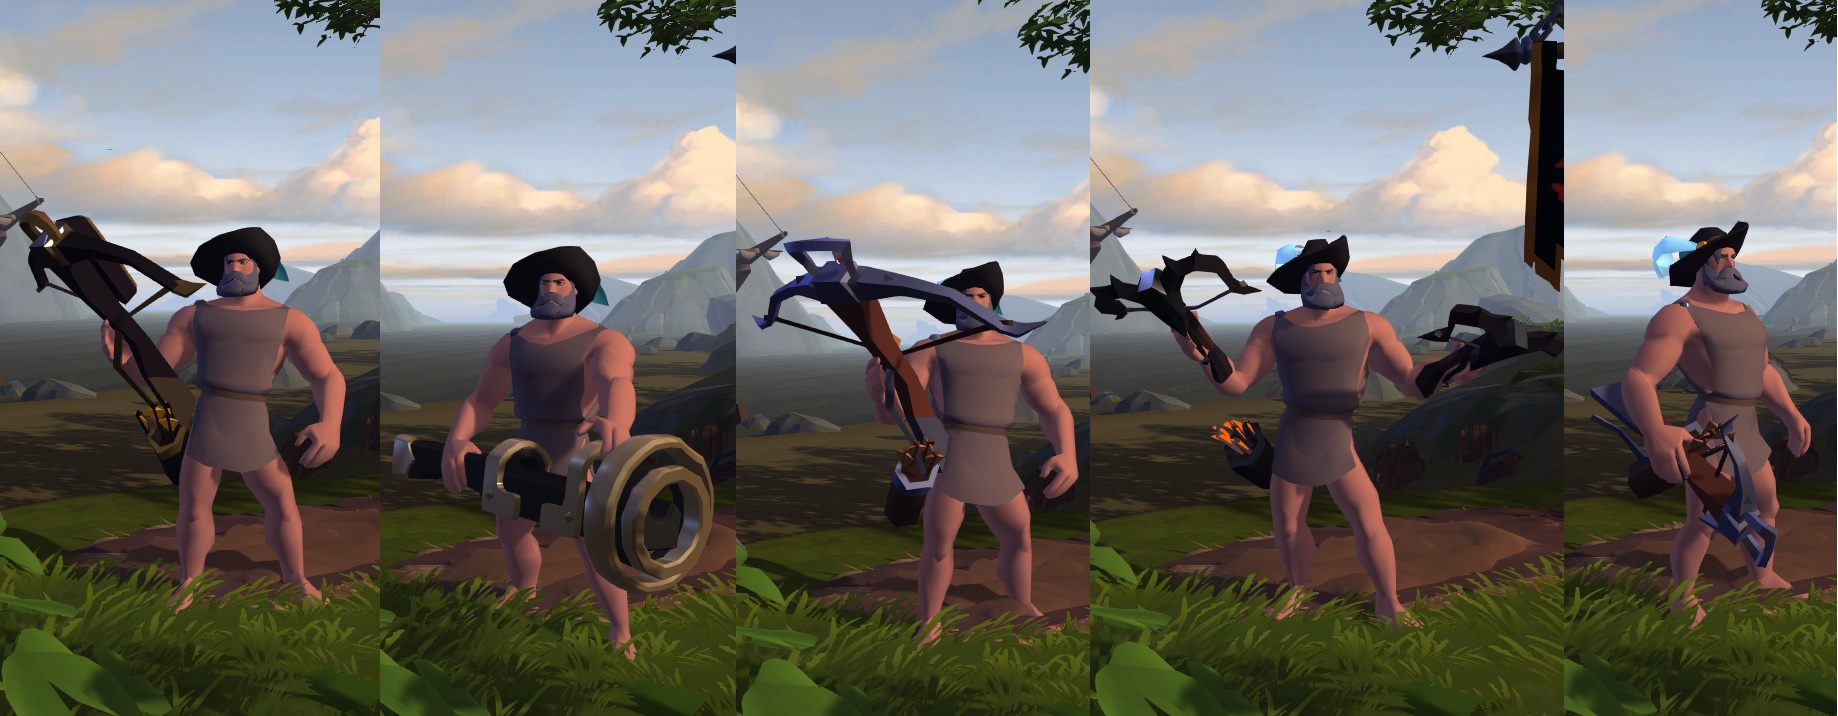
No idea what build to use?
One of the best things about Albion Online is that your character is not restricted to a single class. You can mix and match different weapons and gears to create your build as much as you like.
But just because you can, doesn’t mean you should!
Well, you don’t need to think too much about your build when you’re just playing casually. But if you’re looking for a fight with other players, you have to think twice about what build to use if you want to emerge victorious.
To help get you started, here are the top 10 best Albion Online builds.
9. Spear Hunter
The "jack-of-all-trades" build
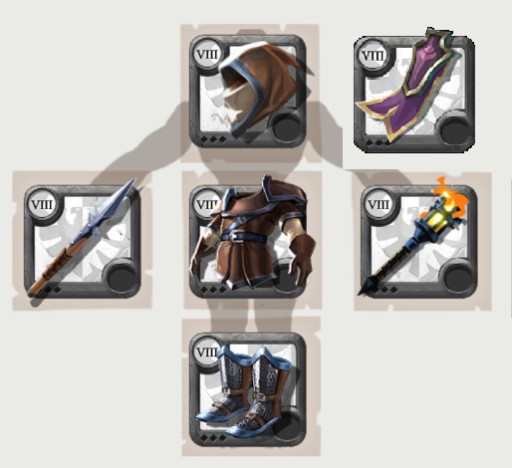
Spear Hunter revolves around the versatility of the One-Handed Spear. This set is excellent for open-world roaming, especially in the Roads thanks to its insane mobility.
With this build, you can easily chase down lone players (especially gatherers) or quickly run away from gankers.
The One-Handed Spear + Soldier Boots combo gives you the mobility that this build is known for. While the Hunter Hood and Mercenary Jacket let you survive fights much longer.
If you’re looking for a gatherer or a solo player to chase, you can use Cripple (W3) on your weapon’s W slot. It’s a slow + damage that can remove all your target’s movement speed buffs.
Impaler (W5) deals a ton of damage and slows your opponents, which makes it decent for chasing as well. You can also use Harpoon (W5) for catching people, but it’s unreliable so you’re better off using Impaler or Cripple instead.
Forest of Spears (W1) can be decent in group fights with the right team composition, but it’s mainly used for killing mobs quickly in PvE.
The main W skill for this build is Deflecting Spin (W4). It’s a channeled spell that increases your resistances and reflects all physical damage that you take. This skill combos well with the Mercenary Jacket’s Bloodlust.
When you’re low on health, just use Bloodlust then Deflecting Spin and you’ll get back to almost full HP in no time. It’s a great comeback strategy after fooling your enemies that you’re almost dead.
The Hunter Hood’s Retaliate allows you to survive fights longer with a magic resistance bonus and reflect. The Soldier Boots’ Wanderlust serves as another chasing or escaping skill, and the Thetford cape is there for the additional damage.
Spear Hunter excels in:
- Solo open-world roaming
- Hit-and-run tactics
- Chasing noobs that are solo
- Escaping noobs in a group (or killing them)
Pick Spear Hunter if:
- You like murdering lone people in the open world and stealing their loot
- Outplaying your opponents and stealing their loot
- Fighting (and winning) 1 vs 2-3 fights (and stealing their loot!)
8. Double-Bladed Chaser
There's no running away from this build.
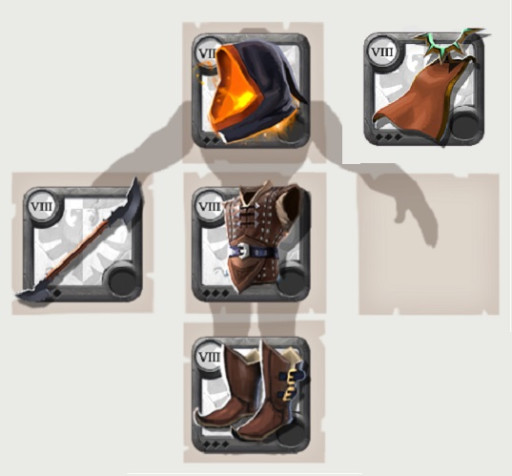
This build is mainly for ganking and chasing your victims, but it’s also good for escaping. The Double-Bladed Staff offers one of the best mobility in the game and together with this whole set, even a Stag would have a hard time outrunning you.
Using Soaring Swipe (E) allows you to leap toward a target area, dealing damage and slowing on impact. But the damage is just the tip of the iceberg. Its main attractions are the long leap distance and short cooldown.
Soaring Swipe has a maximum distance of 15m with only a 15-second cooldown. This means that you can cover a distance of 60m within 60 seconds using only this skill—not something that’s possible with other weapons (aside maybe from Bloodletter and One-Handed Spear).
BUT THERE’S MORE!
The Staff’s other ability, Stun Run (W2), gives you a movement speed buff and includes a stun on your first attack. Soaring Swipe + Stun Run lets you catch any unmounted player - as long as you don’t get juked.
The Quarterstaff weapon tree also has other W skills that deal AOE damage, disarm, or slow. But Stun Run is usually the best, especially with the Double-Bladed Staff.
The Fiend Cowl is a part of this set thanks to its purge. You can use it to purge movement speed buffs like Wanderlust, allowing you to catch those poor noobs who think they can escape from you.
The Hunter Shoes provides a short movement speed buff and slightly increases your CC duration. It synergizes well with your weapon’s slow (Soaring Swipe) and stun (Stun Run).
Assassin Jacket and Undead Cape are both helpful for escaping when you get chased or, worse, counterganked.
Remember that time when you tried to kill a “lone” player only to get clapped by 5 other players hiding behind? This set allows you to run away from those groups.
You can also use Assassin Jacket’s Ambush to sneak up on unsuspecting victims or gatherers (or even AFK people - free loot is free loot!).
Double-Bladed Chaser excels in:
- Ganking and chasing your targets
- Running away from other players (You’re not scared. You just don’t want to kill them.)
- Sneaking up on your victims
Pick Double-Bladed Chaser if:
- You know how to take advantage of good mobility
- You want to gank solo or with a small group (preferably 2 to 3 players)
- You like to play cat and mouse with your victim
7. Berserker
Don't forget to get into your enemies' faces.
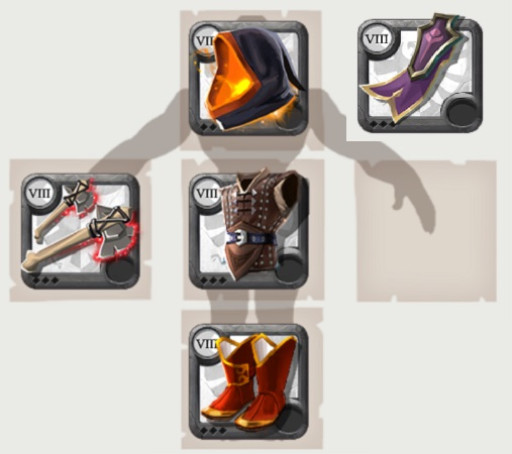
Looks familiar? Well, this build uses the same head and body slots as the previous one. The main difference is the weapon—and it’s a big one.
While the Double-Bladed Chaser is built for chasing, running, and kiting people around, the Berserker build is designed for players who want to jump into the face of their opponents.
Both these builds are great, but they fulfill very different roles.
Berserker takes advantage of the decent mobility and high damage output of the Bear Paws. Its main damage source is its Rending Rage (Q3), which debuffs the enemy with bleed stacks and a root. The best part about this is that it’s an AOE, so the bleed applies to all enemies hit.
The Axe weapon tree has several useful W skills, but the most potent ones are Adrenaline Boost (W2) and Raging Blades (W5).
Adrenaline Boost boosts (no pun intended) your movement speed and attack speed, and it lasts longer as you damage your enemies. It’s very fitting with the In-Your-Face playstyle of the Berserker.
The same goes with Raging Blades. The more players you hit, the greater your damage in the next few seconds, making it the ideal skill when you’re always in the middle of the enemy team.
Razor Cut is Bear Paw’s unique skill. It’s a jump with a range of 15m and deals AOE damage and bleed on impact. Even though there’s really nothing “unique” about this skill, it synergizes well with the overall playstyle of this build.
The Royal Sandal’s Defenseless Rush complements the whole skillset of the Bear Paws. Using it gives you bonus move speed and damage in exchange for a lowered defense. It’s a double-edged sword—you get to your opponent’s face quicker and deal more damage, but you also take more damage and die faster.
As usual, Assassin Jacket provides a form of either escape or sneak attack. And the Thetford Cape is there for consistent, additional damage.
Berserker excels in:
- Slowly dealing damage to multiple people
- Getting in the face of your victims
- Balance between mobility and damage
Pick Berserker if:
- You like the melee DPS playstyle
- You’re not afraid to be in the middle of group fights
- You like maneuvering in team fights
6. Open-World Priest
Did somebody call the healer?
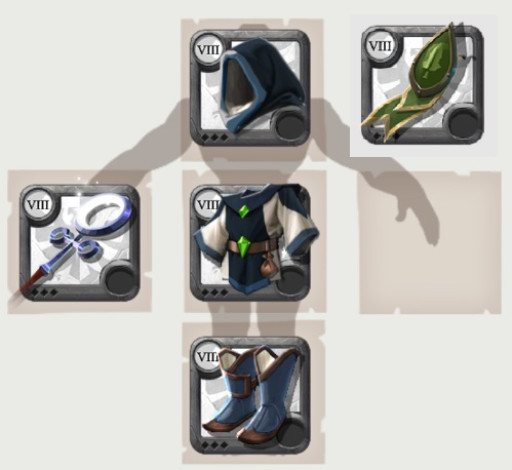
All the builds so far involve only DPS sets. Now it’s time that we mix it up. Next on this list is the Open-World Priest, which (obviously) is a build for healers.
Of course, you shouldn’t expect to kill other players with this set as a solo player. You also shouldn’t expect to get many kills in group fights. But what you could expect are the praises and admiration from your DPS and Tank teammates after you save them from near-death for the Nth time!
What sets the Great Holy apart from the other priest staves (technically and figuratively) is its Holy Explosion. It’s a channeled AOE heal that also knocks back all enemies near you.
Healer mains know too well the terrible feeling of getting focused by a dozen enemy melee and ranged DPS. Well, the good thing about the Great Holy is that you get to deal with half of those—the melee DPSs. Using Holy Explosion at the right time can leave the enemy Melees vulnerable and out of position while you reset your (and your team’s) HPs.
Holy Orb (W4) is the main W skill for PvP. It’s a skillshot burst AOE heal that restores a lot of HP when it hits (you won’t miss anyway, right?).
The Cleric Cowl and Cleric Robe are there so you don’t die as easily. You’ll be the focus of the enemy DPS during fights (if they know what they’re doing), and the Cowl’s Ice Block and the Robe’s Everlasting Spirit allow you to survive a bit longer. Just make sure not to overlap these two as every second of being alive is precious for a healer—and a matter of life and death for the whole team.
Lymhurst Cape provides you with a much-needed mana regen. Spamming your Qs in fights is common, and healers without proper mana management will quickly find themselves not having enough to heal a dying teammate. Lymhurst Cape helps you with that!
Open-World Priest excels in:
- Open-world healing (duh)
- Good against melee DPS-heavy teams
- Small- to medium-scale fights
Pick Open-World Priest if:
- You play with a group and engage in small- to medium-scale PvPs
- You are good at positioning and managing your mana
- You are a selfless player (want a medal?)
5. Lone Ranger
I don't need company.
Bows are some of the easiest weapons to learn in Albion Online, but that doesn’t mean they’re weak. In fact, a lot of Bow builds are viable in high-level PvPs as long as you know what you’re doing.
The Lone Ranger may be easy to learn, but it is difficult to master. This build relies heavily on kiting your target/s and wearing them down over time.
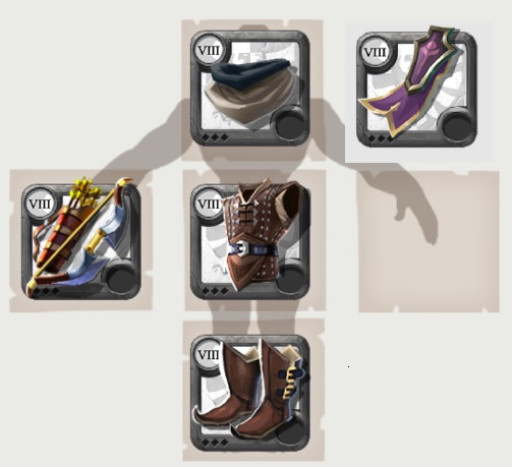
The Warbow’s Magic Arrow is a single-target skill that deals higher damage the farther your target is. It’s a relatively slow-moving skillshot, so you’ll need some practice to use it effectively.
The main W skill for this build is Frost Shot (W2), which lets you leap backward while slowing any opponent in front of you. The direction of your leap is opposite the direction of your target, so keep that in mind when using it to either run away or chase after someone.
Explosive Arrows (W1) is also a good skill on its own. It buffs your next 10 arrows to deal significantly more damage. But Frost Shot is better 99% of the time for this build’s overall kiting playstyle.
The Mage Cowl’s Poison is pretty straightforward. You get more damage on your next attack via a Damage Over Time (DOT) effect. Together with the Thetford Cape, this lets you consistently deal a ton of single-target damage.
The Assassin Jacket and Hunter Shoes provide you with extra mobility and maneuvering you can use to win fights.
The Lone Ranger’s playstyle relies on kiting your opponents, so proper positioning and timing are essential. You’ll usually spend more than half the time running back and forth as you wear down your opponent with the damage from your Q, E, and Thetford Cape.
Lone Ranger excels in:
- Kiting playstyle and outplaying your opponents
- Single-target damage over time
- 1 vs 2 to 3 open-world fights (as long as you know how to kite properly)
Pick Lone Ranger if:
- You already have at least intermediate mechanical skills and game knowledge
- You often play alone in the open world
- You find it enjoyable to kite and outplay other players for 5 to 10 minutes
4. Carving Brawler
Perfect for the melee DPS player
If you’re experienced in PvPs in the mist or small- to medium-scale in the open world, then you’ve probably encountered this build multiple times already. The Carving Brawler is almost a staple in group fights, and any competent team always has at least one Carving Sword main.
The Carving Brawler is similar to the Berserker as you’re most likely going to be in the middle of the enemy team hacking and slashing away. But the Carving Sword has much more potential for clapping with a coordinated team.
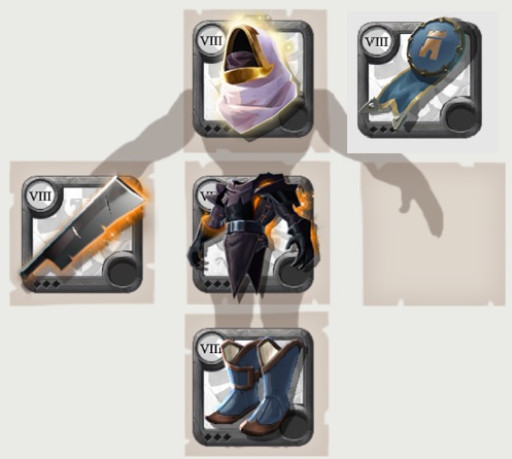
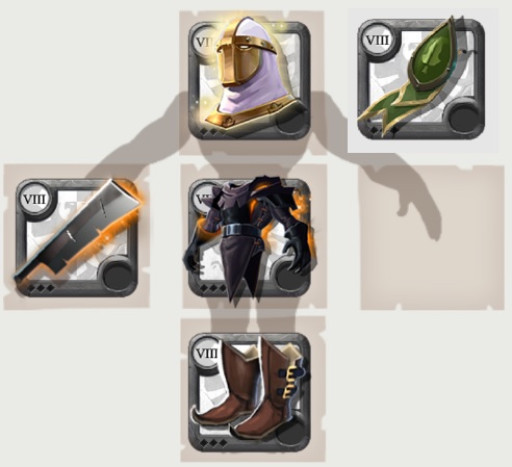
The Carving Sword’s Fearless Strike deals decent damage to targets in a rectangular area. But its main attraction is its resistance reduction.
The more Heroic Charges you have, the higher the resistance reduction to your opponents. This lets you shred through your opponents’ HP (and kill them in the process). A well-timed Fearless Strike, coupled with 1 or 2 AOE skills from your team, can obliterate the entire team in just a few seconds.
Iron Will (W2), Splitting Slash (W4), and Parry Strike (W5) are all viable W skill options.
Iron Will lets you move faster and become tankier while also making you immune to purges. Splitting Slash is great for catching people and rooting clumped-up enemies. While Parry Strike is an excellent defensive and AOE skill overall but requires perfect timing every time you use it.
Since you’ll mostly be in the middle of the enemy team or diving into their backlines, Hellion Jacket is perfect for this build. It gives you excellent sustain through the Life Steal Aura, allowing you to last longer in fights as you hack and slash the enemy healer (or anyone in the enemy team, really).
This is also the reason why Martlock Cape is the best for this set. It boosts your defenses when your HP is low, helping you survive longer. Though, you can also use Lymhurst Cape if you’re experiencing mana issues often.
Timing your Life Steal Aura correctly with the Martlock buff can potentially heal you from 1% to 80% HP in just a few seconds. And this doesn’t include the heals you get from your healer who’s probably getting harassed by the enemy DPS for the last 5 minutes!! You can also combo this with Iron Will to make it uncounterable by purge.
You can change the Helm and Boots slots depending on your preference and team composition. Helmet of Valor is better if your team has limited purges, while Hood of Tenacity is better when you’re tasked to focus on the enemy healer.
Scholar Boots is better than Hunter Shoes if you’re using Martlock Cape instead of Lymhurst Cape because you won’t have any other way to regenerate mana. And you’ll surely run out of mana with this build if you’re not careful with your skills.
Carving Brawler excels in:
- Shredding through your opponents’ defenses
- Boosting your team’s clapping potential (with the resistance reduction)
- Diving right into the enemy team and just hacking and slashing away
Pick Carving Brawler if:
- You like the melee DPS playstyle
- You have reliable teammates with good AOE damage
- Popping Hellion Jacket at 1% HP is your jam
3. Perma-Clapper
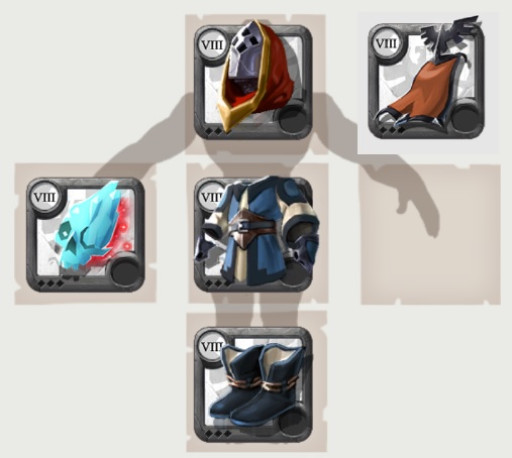
You do one thing and one thing only: clap 'em.
Okay, we already have the resistance reduction of the Carving Brawler as no. 4 on this list. Now, what we need is a good AOE burst damage to pair with it.
ENTER THE PERMA-CLAPPER!
The Permafrost Prism’s Ice Crystal is undeniably one of the best AOE skills in the game. It stuns enemies in a large area, then deals insane damage after the stun. The stun only lasts for 1 second, but that pretty much guarantees the damage as it prevents your enemies from escaping.
This whole build focuses on dealing as much damage as possible while staying behind your team (not that you’re afraid, you’re just playing smart!). You don’t have to do much - just spam Ice Shard (Q3) on your enemies and use Ice Crystal when the time is right.
Also, just remember this simple formula: Royal Cowl’s Perpetual Energy + Scholar Robe’s Speed Caster + Morgana Cape = dead enemies.
Timing your Ice Crystal is the most important thing for a Perma player as a well-timed combo can be the deciding factor in a fight.
For example, Fearless Strike’s resistance reduction together with Ice Crystal almost always guarantees that half of your enemies will die (or lose at least 80% of their HP). The Carving Sword + Permafrost combo is well known (and commonly used) for a reason!
When you’re getting dove or chased by the enemy DPS or tank, you have Frost Nova (W2) to escape, which is a blink + damage + stun. It’s also decent for chasing and finishing off an enemy due to its decent range of 11m.
The Cleric Sandals also has a blink in case the enemies are REALLY keen on killing you. But remember that both Frost Nova and Cleric Sandals have 20-second cooldowns, so don’t waste them by blinking when you don’t have to.
Perma-Clapper excels in:
- Dealing massive AOE damage
- Being slippery while dealing damage from behind
- Clapping your enemies
Pick Perma-Clapper if:
- You have proper positioning as a ranged DPS
- You have reliable teammates
- You want to clap every red player you see
2. The Amazing Mace
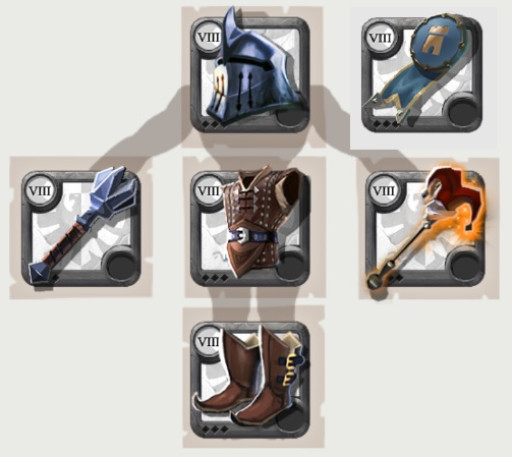
The sound ain't so sweet for your enemies.
As cringey as it sounds, the Amazing Mace does live up to its name. The One-Handed Mace is an amazing weapon by itself, but this build brings out the best in this weapon.
I had a hard time choosing between this build and no.3, as they both deserve to be high on this list. But I decided to rank The Amazing Mace higher simply because it’s more flexible.
The One-Handed Mace has a lot of CC and damage in its arsenal. Threatening Smash (Q2) is its main Q skill, which deals a large amount of damage in a small cone in front of you.
The Snare Charge (W2) of the Mace weapon tree is a strong CC + damage + mobility skill in one, making it the best W mace skill for PvP. It allows you to jump on your opponents and root everyone in the area of impact. It doesn’t deal a lot of damage, but it has a range of 11m and only a 15-second cooldown.
The One-Hand Mace’s prized possession is its E skill, Deep Leap. It’s also a jump like the Snare Charge but with a longer cooldown (25s). However, it deals waaaaaaaaay more damage, and you’re immune to CC and damage while in the air. And did I mention that it also stuns and slows on impact?
Now, imagine running away from an enemy using Snare Charge and Deep Leap. Chances are, you won’t! You’ll get CCed into oblivion and eventually die to the Mace’s damage.
You can play this build effectively both as a solo player or with a group.
For solo players, Assassin Jacket is the go-to for the chest slot together with a Guardian Helmet for better survivability. For group play, you should use Helmet of Valor for the AOE purge and Judicator Armor for the AOE defensive support.
The Martlock Cape and Hunter Shoes are both pretty standard for melee DPS with CC, though Demon Cape is also a decent replacement. The Leering Cane off-hand is great, but you can also use Taproot for solo roaming if you prefer.
The Amazing Mace excels in:
- Solo and small-scale group fights
- Chasing and locking down targets (and killing them)
- Protecting your healers while harassing the enemy healer
Pick The Amazing Mace if:
- You like to lock down and clap huge clumps
- You want to play as a tank and CC master of some sort
- You know how to pick your targets
1. Dreaded Bloodletter
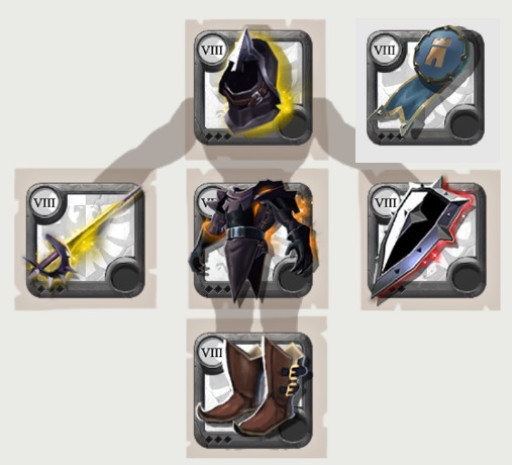
You can't go wrong with the Bloodletter.
Choosing the best builds in Albion Online depends on the kind of content that you want to go for. Even for PvP, there are a lot of smaller subcategories you can choose from - solo, small-scale, medium-scale, large-scale/ZVZs, open world, Corrupted Dungeons, etc.
That’s why it can be difficult to curate a general list like this one (but I did, anyway!). But while most weapons are good only for certain kinds of content, the Bloodletter is one of the few weapons that excel in almost all of them.
The Bloodletter has all the tools of the Dagger weapon tree—all its versatility, mobility, and damage—and possesses potentially one of the most powerful skills in the game: Lunging Stabs.
Lunging Stabs deals decent damage in a straight line when the targets are above 40% HP. But hitting players below 40% HP is most likely a death sentence for them – dealing as much as 150% more damage than normal. This is also an AOE skill, so that means potentially more unfortunate victims for you to annihilate.
Throwing Blades (W1) is decent for PvP, and it’s mostly used by beginners since it’s the first unlocked W skill. It’s also good for chasing but the other W skills usually outclass it.
The two more widely used W skills are Shadow Edge (W4) and Chain Slash (W5). Shadow Edge is mainly used by gankers thanks to its staggering 22-meter range! This also pulls you toward your target, so it’s the best gap-closer as far as gap-closing goes.
Chain Slash is better for small- to medium-scale fights. It lets you jump around and deal damage while also being invisible and immune to damage. It’s an annoying skill that’s also potentially lethal.
The Hellion Jacket, Facebreaker, and Martlock Cape are all for survivability. They let you survive longer in fights, and the first two also offer some decent bonus damage. The longer you stay in a fight, the more you can wreak havoc on the enemy.
The Stalker Hood’s Mortal Agony gives you 15% bonus damage for 4 seconds. If you manage your cooldown well, you can maximize its effect to deal even more damage.
Bloodletter is also fine for ZvZs, but being in the middle of a zerg probably means death for you as a leather user. And besides, Bloodletter has a very different role when a part of a zerg (*cough* disgraceful rat *cough*).
The build here is mostly for small- to medium-scale fights, but the idea is more or less the same for all kinds of content. You’ll only need to switch an item or two depending on what you need.
Dreaded Bloodletter excels in:
- Dealing consistent damage
- Finishing off your opponents
- Slashing and blinking around during fights
- Being a constant annoyance to all your enemies
Choose Dreaded Bloodletter if:
- You are confident in your mechanical skills and knowledge
- You want a build that’s useful in almost all kinds of situations
- You have no mercy and like to finish off dying players
BONUS: Locus Player
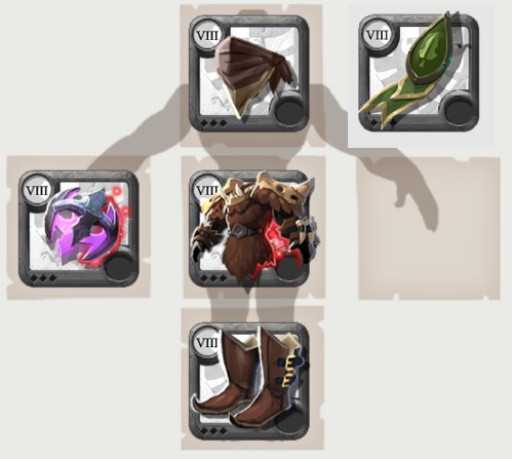
Either you die a hero, or you live long enough to get flamed by your guild.
I had to include this build on this list, but I didn’t know where to place it. Unlike the other builds on this list, this one has no clear ranking because it’s only really useful in one kind of content: ZvZs.
Although you’ll only see it in ZvZs, it often plays a game-winning (or losing) role in fights. And some veterans even say that being the “Locus player” is THE MOST IMPORTANT role in ZvZs.
The ZvZ OG Arcane utilizes the insanely impactful ability of the Malevolent Locus, The Void. The Void is an uninterruptible channeling ability that protects and cleanses all your allies in the area.
Its effects may look simple, but the increased damage resistance and removal of debuffs are nothing to laugh at. This skill can singlehandedly save a whole army from being deleted from the face of Albion.
A well-timed The Void can allow your zerg to survive a clap and launch a battle-winning counterattack. But a terribly-timed one can cause your whole army to crumble.
Motivating Cleanse (W4) is the best W skill for ZvZs, and Arcane Protection (Q2) is best in the Q slot. The Judicator Armor provides additional protection for your team, but it’s less reliable since you’d have to be in a dangerous position to use it effectively.
The Assassin Hood’s only role is to make sure that you use The Void more frequently in a fight (yes, The Void is THAT powerful). Though, it also refreshes your other skills, which is always a welcome bonus. You’d also want to have a Lymhurst Cape to help sustain your mana usage.
Overall, this build is very unique because it’s only really useful in one role, but it’s exceptional (some may say, the best) in that regard. Hence, I put it on this list as a “bonus” build instead.
Locus Player excels in:
- Setting up counterattacks and counter-engages
- Singlehandedly (maybe) keeping your zerg alive (and winning the fight)
- Providing considerable impact to your team
Choose Locus Player if:
- You like playing support
- You like playing ZvZs
- You don’t mind not getting credit for being the reason that your guild won the fight

