The Last of Us Part 2 comes jack-packed with an unprecedented amount of accessibility and “quality of life” options. A single gaze over the long list under the main options menu, which leads to numerous other sub-menus, each with a dozen available settings – may seem daunting at first. There’s a lot of substance under that iceberg though, and it’s all worthy of consideration.
To make things easier for you, we’ve compiled a list of the 15 most effective and (presumably) most useful gameplay settings, which will surely ease your search for the perfect way to experience this game.
15. Unlimited Invisibility While Prone
We start things off with this cheat-like option, which is never the less, completely legit in this game. Its very existence is a testament to the groundbreaking approach that developer Naughty Dog took around the concept of “difficulty” in their game.
Playing stealthy might not be everyone’s cup of tea. In any case, it is universally considered as a “not a good time”, having to re-do a lengthy section, just because the last enemy spotted you after you silently took out all members of its crew. Yeah, it isn’t pretty.
TLoU 2 can often feel like one such encounter after another, but alas, this option can land quite the helping hand. Once enabled, all enemies will be completely unable to spot the player, for as long as she stays prone. It’s also worth noting that it can be toggled on/off at will.
How enabling unlimited invisibility while prone fixes the problem:
- Some encounters can feel unfair in how frequently enemy patrol routes overlap
- Not having to restart a long encounter when noticed, prevents a lot of frustration
How to apply unlimited invisibility while prone:
Press the “Options” button on your controller, then choose Options > Accessibility > Combat Accessibility > Enable “Combat Accessibility” > Set Invisible While Prone to “Unlimited”
14. Enhanced Listen Mode
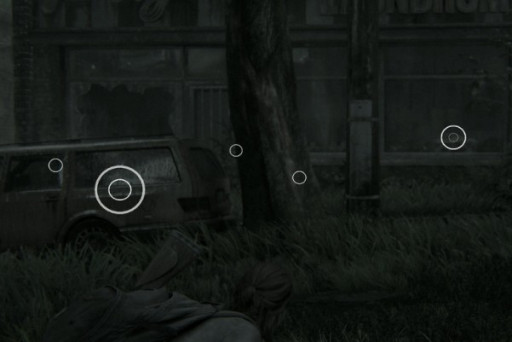
Managing your resources and staying competitive in the arms race against your enemies, requires a lot of scavenging through abandoned kitchens and the like. Since this is a long game, the process of collecting crafting materials eats up a respectable amount of time. Not to mention all those times when Ellie/Abby opens a drawer, only to find nothing inside.
The enhanced “scan” can work for tagging enemies as well, and a lot better than the regular “listen mode”. Very helpful for players with limited vision.
How enabling enhanced listen mode fixes the problem:
- Puts very visible circles around items, saving a lot of scavenging time
- Provides crispier outlines of enemies behind walls
How to apply Enhanced Listen Mode: Press the “Options” button on your controller, then choose Options > Accessibility > Navigation and Traversal > Enable “Enhanced Listen Mode”
13. Repeated Button Presses – Hold
Many of the foes that roam Seattle are capable of grabbing and holding the player, all while putting a lot of scratch marks on her skin. A process consistently painful, regardless of the number of presses hammered on the square button in that five-second interval.
Understandably, surviving few such rendezvous in a succession will prove taxing on the gamer’s stamina. Thankfully, there’s this solution.
How enabling the Hold setting for the Repeated Button Presses fixes the problem:
- Instead of requiring 20-30 presses to break free, the game will ask for the player to simply press and hold the button down
- Preserves a lot of stamina in crowded areas
How to apply the Hold setting for the Repeated Button Presses: Press the “Options” button on your controller, then choose Options > Accessibility > Alternate Controls > Under Holds and Presses> set Repeated Button Presses on Hold
12. High Contrast Display
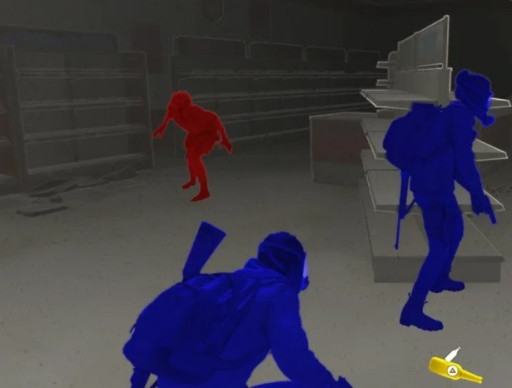
TLoU 2 is an exemplary product for the power and rendering prowess of the PS4, the PS4 Pro, and the PS5. It features picturesque but photo-realistic environments, characters models, weapons, and of course – detailed textures of every individual grain of grass. The list goes on with dynamic shadows/ light effects, somewhat destructible scenery, etc.
However, such a virtually perfect presentation of real-life encounters can also act as an added handicap for the player. In a game where enemies possess intelligence and change their approach on the fly, not being able to spot them because of the realism aspect, may seem vicious. All the more so for players who don’t partake in the “intensely staring at the screen for prolonged periods” exercise.
How enabling High Contrast Display fixes the problem:
- Completely changes the coloring of the game, dedicating separate, unique colors for the environments, the player, and the foes, respectively
- Puts heavier focus on the gameplay instead of the visuals
How to apply High Contrast Display mode: Press the “Options” button on your controller, then choose Options > Accessibility > Magnification and Visual Aids > Choose the desired High Contrast Display setting
11. Auto Pick Up
Tired of those multiple triangle prompts when near resources? This option addresses just that – it “trains” Ellie/Abby to automatically pick up nearby ammo and materials, and not wait on the player’s command to do so. Just as hardened survivors like them would do.
How enabling Auto Pick Up fixes the problem:
- Circumvents a persistent “video-gamey” segment in a game that sacrifices a lot in the name of realism
- Makes for a lot smoother experience
How to apply Auto Pick Up mode: Press the “Options” button on your controller, then choose Options > Accessibility > Alternate Controls > Toggle Auto Pick Up to On
10. Pick Up Notifications
After a while, picking up a group of half a dozen resources, clustered together on a table, turns into a reflex-like move. We don’t exactly count how much we take and from which exact material, we just know that it’s something beneficial. Not to mention that having the nb.10 option enabled, turns this process into a completely automatic one.
Because of that, having a sort of a “counter” for what exactly we’ve scavenged, does fit naturally on the game screen.
How enabling Pick Up Notifications fixes the problem:
- Makes it easier to track the exact number of scrap we carry – no need to stop and open the backpack as often
- The same goes for whichever particular resource is dwindling fast
How to apply Pick Up Notifications: Press the “Options” button on your controller, then choose Options > HUD > Toggle Pick Up Notifications on
9. Skip Puzzle
The game stinginess with life-preserving resources is a key element of its gloomy atmosphere. This is debatable, though, as the game can also “reward” the player with a ton of resources, but at first, will place them inside indestructible safes. And not only that, but many super-important weapons are acquired specifically by knowing the right safe combination, so it is entirely possible to finish the game without even finding one.
Admittedly, the linear nature of the story prevents these puzzles from becoming multi-layered, but still, they are never too simple either.
How the Skip Puzzle option fixes the problem:
- Searching for the combinations is often time-consuming and the answers are always completely unimportant in terms of plot
- Allows impatient players to fully taste the game’s combat
How to apply the Skip Puzzle option: Press the “Options” button on your controller, then choose Options > Accessibility > Navigation and Traversal > Enable Skip Puzzle
8. Persistent Center Dot
Almost every action game in existence features a reticle that displays in the center of the screen whenever the player aims with a weapon. Not just through a scope, mind you, but with all kinds of firearms. Unfortunately, that reticle will disappear whenever the player enters cover, which makes it hard to quickly stand up and place a precise shot, before sliding back into cover.
TLoU 2 allows this reticle to be always present, thus making it a lot easier for us to correctly position our aim in that crucial split second. Hide, pop a head shot, quickly hide again.
How the Persistent Center Dot option fixes the problem:
- The player no longer need to calculate where the center of the screen is, amidst heated arguments with numerous foes
- Easy to get used to
How to apply the Persistent Center Dot option: Press the “Options” button on your controller, then choose Options > Accessibility > Motion Sickness > Enable Persistent Center Dot
7. Weapon Sway Off
Like I mentioned, the realism aspect of this game is present throughout, especially with the depiction of the featured weapon types. They all behave quite believable when handled by young characters, with no actual military training.
That being said though, many can find the unprompted circling of the reticle to be annoying against the legions of moving enemies. So, because we primarily play games so we can enjoy ourselves, the developers implemented this option as well.
How the Weapon Sway Off option fixes the problem:
- Tones down one aspect of the game that many can find limiting in its realistic depiction
- Fewer opportunities for frustration because of slightly missed shots
How to apply the Weapon Sway Off option: Press the “Options” button on your controller, then choose Options > Accessibility > Enable Combat Accessibility > Toggle Weapon Sway Off
6. Slow Motion While Aiming
Another setting that feels illicit, but one that also carries great potential in terms of, well, just plain fun. Enabling this setting acts as a drug-like infusion for the player, heightening their senses when it’s needed the most. Maybe not all that suitable for an adventure such as this, but hey – there is no moral authority preventing us from throwing a curveball against the game for a change, no?
How enabling Slow Motion While Aiming fixes the problem:
- Allows for better control when battling numerous foes, attacking from different angles
- Provides an exotic new way to tackle the combat system
How to enable the Slow Motion While Aiming option: Press the “Options” button on your controller, then choose Options > Accessibility > Enable Combat Accessibility > set to Slow Motion While Aiming
5. Motion Blur Off
Blurred vision when performing quick changes in direction, is a modern-day staple when it comes to 3rd person action games. It’s also a problematic one, as it doesn’t actually amplify any aspect of the game. All the more so in a game that intentionally puts the player in claustrophobic scenarios.
Luckily, this effect can be adjusted to one’s level of tolerance.
How turning Motion Blur Off fixes the problem:
- Makes prolonged game-play sessions easier to stomach
- Eliminates a feature that many can find distracting and unnecessary
How to turn Motion Blur Off: Press the “Options” button on your controller, then choose Options > Accessibility > Motion Sickness > manipulate the Motion Blur slider
4. Camera Shake Off
Another manifestation of this game’s dedication to the idea of fully immersing the player in its “reality”. As so, the camera will be practically wrestled out of the player’s hands whenever we sprint or receive a heavy blow. It is a cinematic effect – and one that is well implemented at that – but still, not with an inherently welcomed result.
How turning Camera Shake Off fixes the problem:
- Players maintain better focus when they can rely on the camera 100% percent of the time
- Irons out some of the chaos which ensues once the player is spotted
How to turn Camera Shake Off: Press the “Options” button on your controller, then choose Options > Accessibility > Motion Sickness > manipulate the Camera Shake slider
3. Remember Shoulder Swap
Like the original, TLoU 2 puts great restrictions on just how much space the player can perceive at a given moment. This feeling of “walls slowly closing in” is all the more palpable whenever we are forced to see only what is illuminated by the flashlight – which is quite often. Needless to say, being accustomed to this approach is all the more important once we start exchanging bullets with someone.
The game provides the option to quickly move the camera from one shoulder to the other, but – bafflingly enough – it wills also “forget” that switch on a mere reload action! This can have dire ramifications for the player’s health, but at least, there’s a remedy in the options menu.
How enabling the Remember Shoulder Swap option fixes the problem:
- Shoulder swapping is more than common in games such as this and is also time-consuming in the heat of battle. Enabling this option makes every combat encounter more engrossing
- This feature should’ve been the default setting, no arguments there
How to enable the Remember Shoulder Swap option: Press the “Options” button on your controller, then choose Options > Control > Toggle Remember Shoulder Swap On
2. Adjusting the Field of View
The horror genre uses very small FoV (field of view) as an instrument for achieving greater impact. However, TLoU 2 is a predominantly action game, with a heavy emphasis on stealth and the need to study enemy movements. Therefore, it is a personal preference just how far we’ll allow ourselves to (unrealistically) peek while safe behind cover, but it’s also a major decision.
The important thing to remember here is that there’s isn’t a “right” or “wrong” way to set this slider – it’s just a question of our understanding of what kind of experience we are looking for. And then, fine-tune this option as closer to that goal as we can.
How adjusting the Field of View fixes the problem:
- A setting with heavy consequences on almost every aspect of the game, but all according to the player’s wishes.
How to adjust the Field of View: Press the “Options” button on your controller, then choose Options > Accessibility > manipulate the Field of View slider
1. Adjusting the Aiming Settings
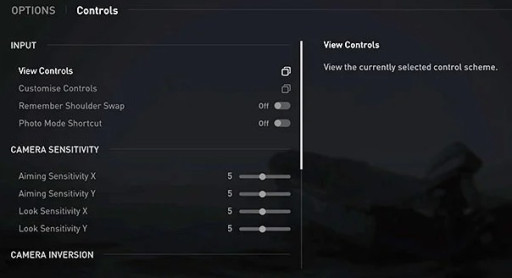
Without a doubt, the first thing after choosing the “new game” option should be to carefully, manually set all of the provided aiming options. Practically, there isn’t any break from the action in the TLoU 2, and being a quick and efficient combatant is mandatory to get through this ordeal.
The game is full of surprise, “jump-scare” like encounters, and knowing how to answer in kind is the most important player skill. So, things like how fast the reticle moves on each axis, or how fast it accelerates when we point it across the screen, are expectedly, immensely important. They are even more relevant to players who’ve made the jump to the PS5, as the increase in framerate carries repercussions primarily with the aiming settings.
Searching for that preferable “sweet spot” is as game-changing in the TLoU 2 as it is in all games that involve firearms.
How adjusting the Aiming Settings fixes the problem:
- Not paying attention to this set of options will immediately alienate the player
- Crucial in establishing a sort of a “comforting”, “in-control” feeling throughout the whole length of the game
How to adjust the Aiming Settings: Press the “Options” button on your controller, then choose Options > Controls > under Camera Sensitivity > manipulate the Aiming Sensitivity X slider > manipulate the Aiming Sensitivity Y slider > manipulate the Aiming Acceleration scale > manipulate the Aiming Ramp Power scale
Which of these options you find to be the most relevant?

