Home
Home PC Game Trailers
 News
News Menu
MenuDestiny 2: How To Change Name
Updated: 26 Mar 2022 8:21 am

Your Guardian waiting for a better display name...
 BY: Moubin Ghafoory

How to Change Your Destiny 2 Display Name for Free
You've got one shot, one opportunity, to change your name in Destiny 2
Last year, Bungie made some huge changes to Destiny 2 in the Season 15 update, especially the addition of Cross-Play. This connects players’ accounts to all other platforms, allowing them to access their characters on all their gaming consoles and join other Guardians.
This update also included a number of system changes, particularly your display name, also known as your Bungie name. Through the Cross-Play update, a name is auto-generated based on the one for the last account you played with.
That Bungie Name, like your Guardian, is shared across all your accounts for Destiny 2. Because of this, some players may want to change their name or make a new one. Here’s how you can do it:
How to Change Your Bungie Name in Destiny 2
- Go to Bungie.net
- Sign in to your account by clicking “My Account” on the top-right corner, right next to the “Play Destiny 2” button. A drop-down menu will appear.
- Click on the platform you mainly play Destiny 2 on. A pop-up window will then appear.
- Type in your username and password for your preferred Destiny 2 platform.
- Once signed in, the page will reload with your profile picture in the top-right corner. Click it and a side-bar menu will appear.
- Find and click the “Settings” icon. That leads to the “Identity Settings” page.
- At the top of the page, you can see the “Display Name” section with a text box showing your current Bungie Name along with an auto-generated hashtag and number.
- In the text box, type in your desired name, then click “Save”.
You can also change your Bungie name through the Destiny 2 Companion App, which you can download on your mobile device. Here’s how:
- After downloading it, tap on the Destiny 2 Companion App to launch it.
- Tap on “Sign in with Bungie.net”. A pop-up will appear on your screen.
- Pick the gaming system you play Destiny 2 on and sign in to your account.
- Signing into the app leads to a home page with a bar of icons at the bottom. Tap on the icon that says “More”.
- On the following page, go down the list and find the “Settings” icon. Tap on it.
- On the next page, tap on “Bungie.net Account Settings”.
- On the next page, tap on “About Me”.
- At the top of the page is your Bungie Name. Tap it then type in your desired name, then tap the checkmark to save your new settings.
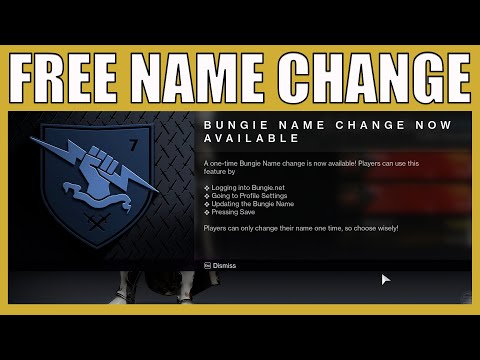
After saving your new display name, you should see it updated on your next play session. Important Note: Bungie has made a recent update on Display Names, allowing players to make a one-time name change for their accounts. Follow the instructions if you want to make one final update for your Display Name in Destiny 2.
You may also be interested in:
- Destiny 2 Class Tier List: The Best Destiny 2 Classes and Subsclasses
- Top 10 Best Destiny 2 Auto Rifles Right Now
- Top 10 Destiny 2 Best Exotic Weapons for PvP
- 10 Best Destiny 2 Hand Cannons (Ranked)
- [Top 10] Destiny 2 Best Shotguns And How To Get Them
- [Top 10] Destiny 2 Best Pulse Rifles And How To Get Them
- [Top 15] Destiny 2 Best PvE Weapons And How To Get Them
- [Top 5] Destiny 2 Best Sniper Rifles And How To Get Them
Share this Article:

- Log in or register to post comments


")